Dowell Email API
Transform your communication workflow with Dowell’s Email API solutions

Dowell Email API
Dowell Email offers a reliable and user-friendly API for sending and validating emails. Our API services provide a seamless experience for sending emails from your own email ID and validating email addresses for accuracy. Whether you need to send important notifications or verify email addresses, Dowell Mail API has got you covered.
To understand the API calls and their functionality, I recommend reading the documentation. The documentation provides comprehensive information on making API requests and utilizing the available endpoints. It explains the required parameters, request methods, and response formats for each API call.
Key Features

Sending Emails
Once you have your API key, you can start sending emails using Dowell Mail API. Our API is designed to be simple and easy to integrate into your existing applications. With a few API calls, you can programmatically send emails, saving you time and effort.

Validating Emails
In addition to sending emails, our API allows you to validate email addresses. By using the validation feature, you can check the validity of an email address before sending any messages. This ensures that your emails reach the intended recipients and helps you maintain a clean and reliable email list.

Free Services
We offer a free tier for users who want to explore our services or have low email volume requirements. The free tier allows you to send up to 25 emails per day and includes email validation. After 24 hours, the count resets, allowing you to send another 25 emails. This tier is ideal for personal projects or small-scale applications.

Paid Services
For users with higher email sending and validation needs, we provide paid services. Our paid tier allows you to increase the number of emails you can send per day and offers bulk email validation. This provides greater flexibility and scalability for your business or larger projects. By subscribing to our paid services, you can also enjoy additional features such as priority support and increased email quotas.

Postman Documentation
For detailed API documentation, including endpoint descriptions, request and response examples, and authentication details, please refer to the API documentation
Dowell Email API Demonstrative Scenarios
In the following scenarios, Dowell will furnish comprehensive instructions on obtaining the Service key and guide you through the steps to use the API. You’ll find examples in various formats such as Python, PHP, React, Flutter, and WordPress in the tabs below. Feel free to explore the examples in each tab for practical insights.
Dowell Email API Use Cases
Discover how Dowell’s Email API transforms your communication strategy! From ensuring email accuracy with Email Verification to providing real-time Transaction Alerts, and maximizing engagement with Marketing Campaigns, to seamless Customer Support integration. Watch our videos to unleash the power of Dowell’s Email API in just a click!
Frequently Asked Questions (FAQs) about Dowell Email API
1. What is the purpose of generating an API key?
Generating an API key is essential for accessing Dowell Email API services. It serves as a unique identifier for your account, ensuring secure communication between your application and Dowell’s API.
2. What are the benefits of using Dowell Email API for sending emails?
Dowell Email API offers a reliable and user-friendly solution for sending emails programmatically, saving time and effort.
3. Is there a free tier available for Dowell Email API?
Yes, Dowell offers a free tier allowing users to send up to 25 emails per day and includes email validation. This tier is suitable for personal projects or low-volume requirements.
4. What happens if I exceed the daily email limit in the free tier?
If you exceed the daily email limit in the free tier, you’ll need to wait for 24 hours for the count to reset before sending additional emails
5. What are the advantages of subscribing to Dowell's paid services?
Subscribing to Dowell’s paid services provides increased email sending and validation quotas, bulk email validation, priority support, and additional features for scalability and flexibility.
6. How can I obtain support if I encounter any issues with the API?
If you encounter any issues, have questions, or need assistance with Dowell Email API, you can contact the support team for prompt assistance. Contact us at Dowell@dowellresearch.uk
7. How can I integrate Dowell Email API into my existing applications?
Dowell Email API is designed to be simple and easy to integrate into existing applications through API calls. The documentation provides comprehensive information on making requests and utilizing endpoints.
8. Is there any limit on the number of email addresses I can validate using Dowell Email API?
There is no specific mention of a limit on the number of email addresses you can validate using Dowell Email API in the provided information. However, it’s recommended to check the documentation or contact support for specific details.
9. What level of security measures does Dowell Email API implement?
Dowell Email API ensures secure communication between applications and its services by using API keys for authentication. However, for detailed information on security measures, it’s recommended to review the documentation or contact support.
10. What other APIs does Dowell UX Living Lab provide besides Email API?
Dowell UX Living Lab offers a wide range of APIs to enhance user experience and streamline various processes. To explore the full list of APIs available, including Dowell SMS, Dowell Newsletter, Samanta Content Evaluator, and many more.
For more details and to explore the complete list of APIs provided by Dowell UX Living Lab, please visit our documentation page.
How To Get The API Key
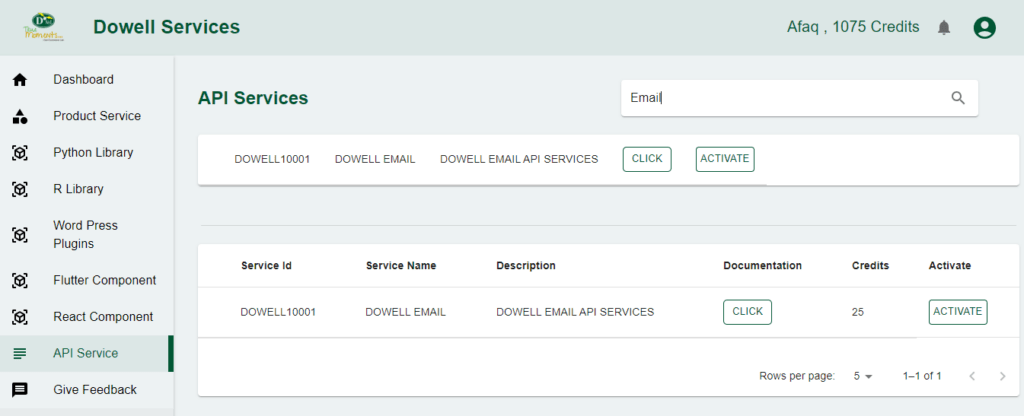
- Access the Dowellstore website through this link: https://dowellstore.org and login. Once on the website, navigate to the API service section and activate the DOWELL EMAIL API service. The API Key you need can be found in the dashboard, provided there as the service key. For more information follow the instructions in the videos found at the link below.
[How to get API key and redeem your voucher Step-by-Step Tutorial] - You can also find a step-by-step guide on how to get the API key and activate the API(s) by following this link Get The Service Key
- Then set the API KEY as part of the url parameter as shown below. Replace with your actual API key. The URL format: https://www.socialmediaautomation.uxlivinglab.online/api/v1/generate-sentences/
- Note: Make sure to activate your API from Dowell API Key System link provided above.
Python Example
1. VALIDATE EMAIL SERVICES
This script performs email validation by sending a JSON payload to a designated API endpoint. Upon success, it acknowledges the resource creation, and in case of failure, it provides details about the unsuccessful request.
					import requests

url =   "https://100085.pythonanywhere.com/api/v1/mail/c2636d98-4f43-4be1-9e3b-47cdfcbe832b/?type=validate"

payload = {
    "email": "pchavda713@gmail.com",
    "name": "parth",
    "fromName": "chavda",
    "fromEmail": "pchavda",
    "subject": "food",
    "body": "hi i m here",
}

try:
    response = requests.post(url, json=payload)

    if response.status_code == 201:
        print("Resource created successfully")
        # Optionally, you can also print or process the response data
        data = response.json()
        print(data)
    else:
        print(f"Request failed with status code: {response.status_code}")
        print(response.text)

except requests.exceptions.RequestException as e:
    print(f"Request failed with an exception: {e}")
2.SEND EMAIL SERVICES
This Python script uses the requests library to send a POST request to a specified URL, creating a resource for sending emails. The payload includes email details such as recipient, sender, subject, and body, and the script prints the success message along with the response data if the request is successful, otherwise printing an error message with the status code.
					import requests

url = "https://100085.pythonanywhere.com/api/v1/mail/c2636d98-4f43-4be1-9e3b-47cdfcbe832b/?type=send-email"
payload = {
    "email": "pchavda713@gmail.com",
    "name": "parth",
    "fromName": "chavda",
    "fromEmail": "parthchavda2127@gmail.com",
    "subject": "trawel",
    "body": "take care",
}

try:
    response = requests.post(url, json=payload)

    if response.status_code == 201:
        print("Resource created successfully")
        # Optionally, you can also print or process the response data
        data = response.json()
        print(data)
    else:
        print(f"Request failed with status code: {response.status_code}")
        print(response.text)

except requests.exceptions.RequestException as e:
    print(f"Request failed with an exception: {e}")
3. EMAIL FINDER SERVICES
This Python script utilizes the requests library to send a POST request to a specified URL, submitting JSON payload containing a name and domain. It checks the response status, printing “Resource created successfully” and displaying the response data if the status code is 201; otherwise, it prints the failure status code and response text. Exception handling is in place for potential request errors.
					import requests

url = "https://100085.pythonanywhere.com/api/v1/mail/c2636d98-4f43-4be1-9e3b-47cdfcbe832b/?type=email-finder"

payload = {"name": "pchavda", "domain": "gmail.com"}

try:
    response = requests.post(url, json=payload)

    if response.status_code == 201:
        print("Resource created successfully")
        # Optionally, you can also print or process the response data
data = response.json()
        print(data)
    else:
        print(f"Request failed with status code: {response.status_code}")
        print(response.text)

except requests.exceptions.RequestException as e:
    print(f"Request failed with an exception: {e}")
PHP Example
1. VALIDATE EMAIL SERVICES
This PHP script uses the requests library to make a POST request to the specified URL with a JSON payload. It checks the response status code and prints the result accordingly.
					<?php
$url = "https://100085.pythonanywhere.com/api/v1/mail/c2636d98-4f43-4be1-9e3b-47cdfcbe832b/?type=validate";
$payload = [
    "email" => "pchavda713@gmail.com",
    "name" => "parth",
    "fromName" => "chavda",
    "fromEmail" => "pchavda",
    "subject" => "food",
    "body" => "hi i m here",
];

try {
    $response = requests('POST', $url, ['json' => $payload]);

    if ($response->getStatusCode() == 201) {
        echo "Resource created successfully\n";
        // Optionally, you can also print or process the response data
        $data = json_decode($response->getBody(), true);
        print_r($data);
    } else {
        echo "Request failed with status code: " . $response->getStatusCode() . "\n";
        echo $response->getBody();
    }
} catch (Exception $e) {
    echo "Request failed with an exception: " . $e->getMessage() . "\n";
}
?>
2. SEND EMAIL SERVICES
This PHP script performs a POST request to a specified URL with JSON payload data using the requests library. It then checks the response status code and prints relevant information.
					<?php
$url = "https://100085.pythonanywhere.com/api/v1/mail/c2636d98-4f43-4be1-9e3b-47cdfcbe832b/?type=send-email";

$payload = array(
    "email" => "pchavda713@gmail.com",
    "name" => "parth",
    "fromName" => "chavda",
    "fromEmail" => "parthchavda2127@gmail.com",
    "subject" => "trawel",
    "body" => "take care"
);

try {
    $response = requests_post($url, json_encode($payload));

    if ($response->status_code == 201) {
        echo "Resource created successfully\n";
        // Optionally, you can also print or process the response data
        $data = json_decode($response->text, true);
        print_r($data);
    } else {
        echo "Request failed with status code: {$response->status_code}\n";
        echo $response->text;
    }
} catch (Exception $e) {
    echo "Request failed with an exception: {$e->getMessage()}\n";
}
?>
3. EMAIL FINDER SERVICES
This PHP script uses cURL to make a POST request to a specified URL with JSON payload, and it handles the response accordingly.
					<?php
$url = "https://100085.pythonanywhere.com/api/v1/mail/c2636d98-4f43-4be1-9e3b-47cdfcbe832b/?type=email-finder";
$payload = ["name" => "pchavda", "domain" => "gmail.com"];

try {
    $ch = curl_init($url);
    curl_setopt($ch, CURLOPT_POSTFIELDS, json_encode($payload));
    curl_setopt($ch, CURLOPT_HTTPHEADER, ['Content-Type: application/json']);
    curl_setopt($ch, CURLOPT_RETURNTRANSFER, true);
    $response = curl_exec($ch);

    $httpCode = curl_getinfo($ch, CURLINFO_HTTP_CODE);
    curl_close($ch);

    if ($httpCode == 201) {
        echo "Resource created successfully\n";
        // Optionally, you can also print or process the response data
        $data = json_decode($response, true);
        print_r($data);
    } else {
        echo "Request failed with status code: $httpCode\n";
        echo $response;
    }
} catch (Exception $e) {
    echo "Request failed with an exception: " . $e->getMessage() . "\n";
}
?>
React Example
1. VALIDATE EMAIL SERVICES
This React script uses the ‘axios’ library to make a POST request to the specified URL with a JSON payload. It checks the response status code and logs the result accordingly.
					// Assuming you're using the 'axios' library for making HTTP requests in React
import axios from 'axios';

const url = "https://100085.pythonanywhere.com/api/v1/mail/c2636d98-4f43-4be1-9e3b-47cdfcbe832b/?type=validate";
const payload = {
    email: "pchavda713@gmail.com",
    name: "parth",
    fromName: "chavda",
    fromEmail: "pchavda",
    subject: "food",
    body: "hi i m here",
};

try {
    const response = await axios.post(url, payload);

    if (response.status === 201) {
        console.log("Resource created successfully");
        // Optionally, you can also print or process the response data
        console.log(response.data);
    } else {
        console.log(`Request failed with status code: ${response.status}`);
        console.log(response.data);
    }
} catch (error) {
    console.error(`Request failed with an exception: ${error.message}`);
}
2. SEND EMAIL SERVICES
This React script uses the Axios library to perform a POST request to a specified URL with a JSON payload. It checks the response status code and logs relevant information.
					import axios from 'axios';

const url = "https://100085.pythonanywhere.com/api/v1/mail/c2636d98-4f43-4be1-9e3b-47cdfcbe832b/?type=send-email";

const payload = {
    email: "pchavda713@gmail.com",
    name: "parth",
    fromName: "chavda",
    fromEmail: "parthchavda2127@gmail.com",
    subject: "trawel",
    body: "take care",
};

try {
    const response = await axios.post(url, payload);

    if (response.status === 201) {
        console.log("Resource created successfully");
        // Optionally, you can also log or process the response data
        console.log(response.data);
    } else {
        console.log(`Request failed with status code: ${response.status}`);
        console.log(response.data);
    }
} catch (error) {
    console.error(`Request failed with an exception: ${error.message}`);
}
3. EMAIL FINDER SERVICES
This React component uses the fetch API to make a POST request to a specified URL with JSON payload, and it handles the response accordingly.
	import React, { useEffect } from 'react';

const YourComponent = () => {
  const url = "https://100085.pythonanywhere.com/api/v1/mail/c2636d98-4f43-4be1-9e3b-47cdfcbe832b/?type=email-finder";
  const payload = { name: "pchavda", domain: "gmail.com" };

  useEffect(() => {
    const fetchData = async () => {
      try {
        const response = await fetch(url, {
          method: 'POST',
          headers: {
            'Content-Type': 'application/json',
          },
          body: JSON.stringify(payload),
        });

        if (response.ok) {
          console.log("Resource created successfully");
          // Optionally, you can also handle the response data
          const data = await response.json();
          console.log(data);
        } else {
          console.log(`Request failed with status code: ${response.status}`);
          console.log(await response.text());
        }
      } catch (error) {
        console.error("Request failed with an exception:", error);
      }
    };

    fetchData();
  }, []);

  return <div>Your React component content</div>;
};

export default YourComponent;
Flutter Example
1. VALIDATE EMAIL SERVICES
This Dart script for Flutter uses the ‘http’ package to make a POST request to the specified URL with a JSON payload. It checks the response status code and prints the result accordingly.
					import 'dart:convert';
import 'package:http/http.dart' as http;

void main() async {
  final url = Uri.parse("https://100085.pythonanywhere.com/api/v1/mail/c2636d98-4f43-4be1-9e3b-47cdfcbe832b/?type=validate");
  final payload = {
    "email": "pchavda713@gmail.com",
    "name": "parth",
    "fromName": "chavda",
    "fromEmail": "pchavda",
    "subject": "food",
    "body": "hi i m here",
  };

  try {
    final response = await http.post(url, body: json.encode(payload), headers: {'Content-Type': 'application/json'});

    if (response.statusCode == 201) {
      print("Resource created successfully");
      // Optionally, you can also print or process the response data
      final data = json.decode(response.body);
      print(data);
    } else {
      print("Request failed with status code: ${response.statusCode}");
      print(response.body);
    }
  } catch (error) {
    print("Request failed with an exception: $error");
  }
}
2. SEND EMAIL SERVICES
This Flutter script uses the http package to perform a POST request to a specified URL with a JSON payload. It then checks the response status code and prints relevant information.
					import 'dart:convert';
import 'package:http/http.dart' as http;

void main() async {
  var url = Uri.parse("https://100085.pythonanywhere.com/api/v1/mail/c2636d98-4f43-4be1-9e3b-47cdfcbe832b/?type=send-email");

  var payload = {
    "email": "pchavda713@gmail.com",
    "name": "parth",
    "fromName": "chavda",
    "fromEmail": "parthchavda2127@gmail.com",
    "subject": "trawel",
    "body": "take care"
  };

  try {
    var response = await http.post(url, body: jsonEncode(payload), headers: {"Content-Type": "application/json"});

    if (response.statusCode == 201) {
      print("Resource created successfully");
      // Optionally, you can also print or process the response data
      print(jsonDecode(response.body));
    } else {
      print("Request failed with status code: ${response.statusCode}");
      print(response.body);
    }

  } catch (error) {
    print("Request failed with an exception: $error");
  }
}
3. EMAIL FINDER SERVICES
This Flutter app makes a POST request to a specified URL with JSON payload using the http package and displays the response.
					import 'dart:convert';
import 'package:flutter/material.dart';
import 'package:http/http.dart' as http;

void main() => runApp(MyApp());
class MyApp extends StatelessWidget {
  @override
  Widget build(BuildContext context) {
    return MaterialApp(
      home: MyHomePage(),
    );
  }
}

class MyHomePage extends StatelessWidget {
  final String url = "https://100085.pythonanywhere.com/api/v1/mail/c2636d98-4f43-4be1-9e3b-47cdfcbe832b/?type=email-finder";
  final Map<String, String> payload = {"name": "pchavda", "domain": "gmail.com"};

  @override
  Widget build(BuildContext context) {
    return Scaffold(
      appBar: AppBar(
        title: Text('Flutter Example'),
      ),
      body: FutureBuilder(
        future: fetchData(),
        builder: (context, snapshot) {
          if (snapshot.connectionState == ConnectionState.waiting) {
            return CircularProgressIndicator();
          } else if (snapshot.hasError) {
            return Text("Error: ${snapshot.error}");
          } else {
            return Column(
              children: [
                Text("Resource created successfully"),
                // Optionally, you can also display or process the response data
                Text(snapshot.data.toString()),
              ],
            );
          }
        },
      ),
    );
  }

  Future fetchData() async {
    try {
      var response = await http.post(Uri.parse(url),
          headers: {'Content-Type': 'application/json'},
          body: jsonEncode(payload));

      if (response.statusCode == 201) {
        // Optionally, you can also return or process the response data
        return jsonDecode(response.body);
      } else {
        throw Exception('Request failed with status: ${response.statusCode}');
      }
    } catch (error) {
      throw Exception('Request failed with an exception: $error');
    }
  }
}
WordPress Example
1. VALIDATE EMAIL SERVICES
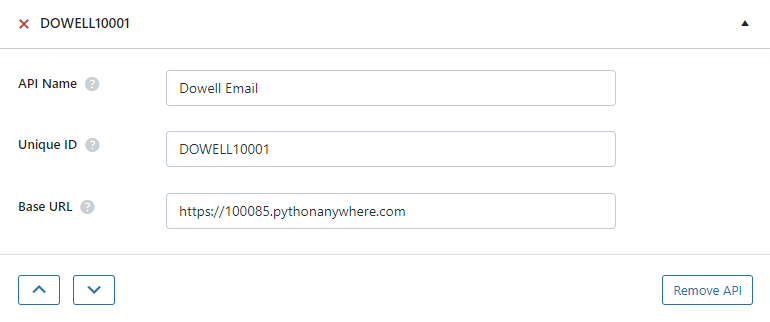
Step 1: Set up the API name, unique ID and the base url(below). It’s a prerequisite to have WP-GET API plugin installed in your wordpress website
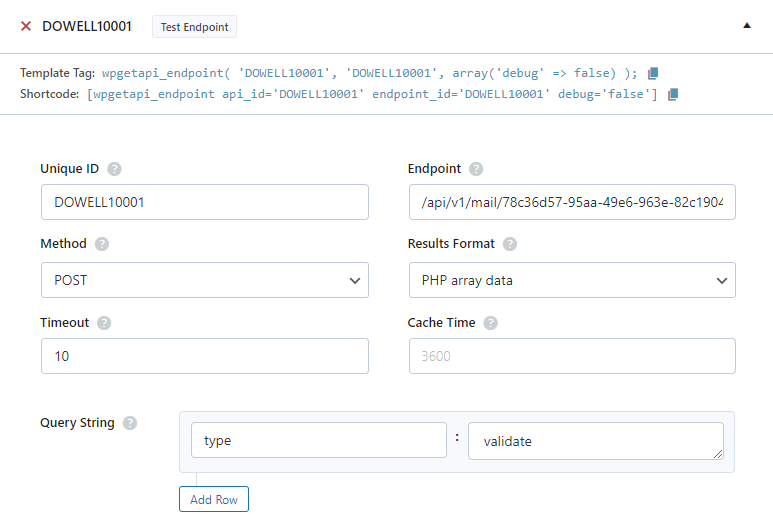
Step 2: Establish the API endpoint with the inclusion of the API key, and configure the request body to contain the required POST fields.
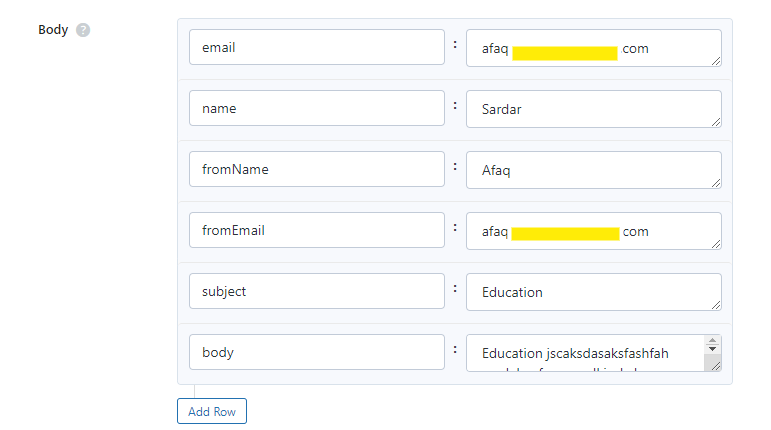
Step 3: Test the endpoint to obtain a jQuery response from the API. Ensure that the API is functioning correctly by sending a test request and examining the response.
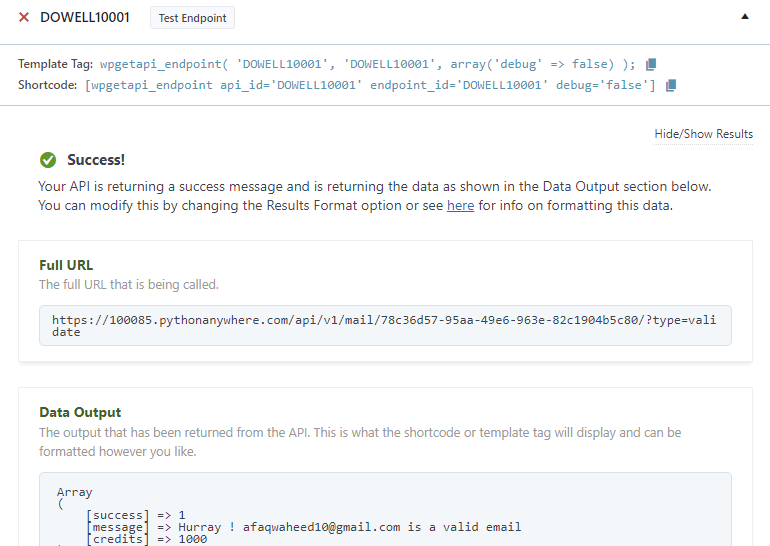
Step 4: To display the output fetched from the Mail API service, copy the shortcode provided by the plugin and add it onto your wordpress website page.

2. SEND EMAIL SERVICES
Step 1: Establish the API endpoint with the inclusion of the API key, and configure the request body to contain the required POST fields.
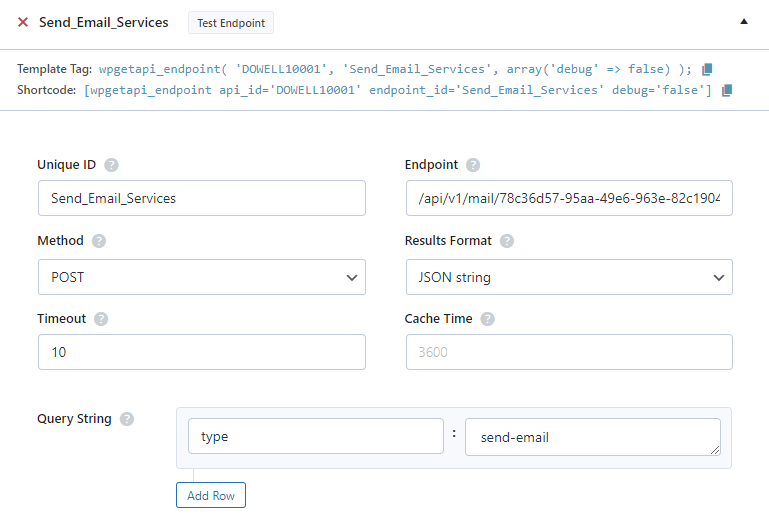
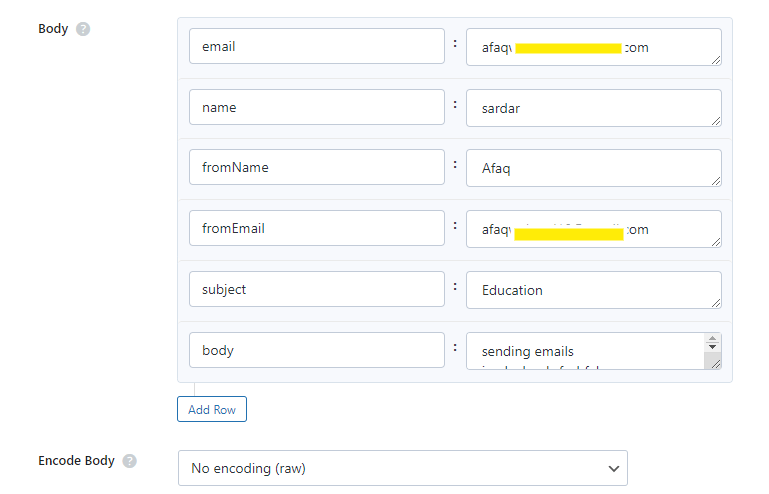
Step 2: Test the endpoint to obtain a jQuery response from the API. Ensure that the API is functioning correctly by sending a test request and examining the response.
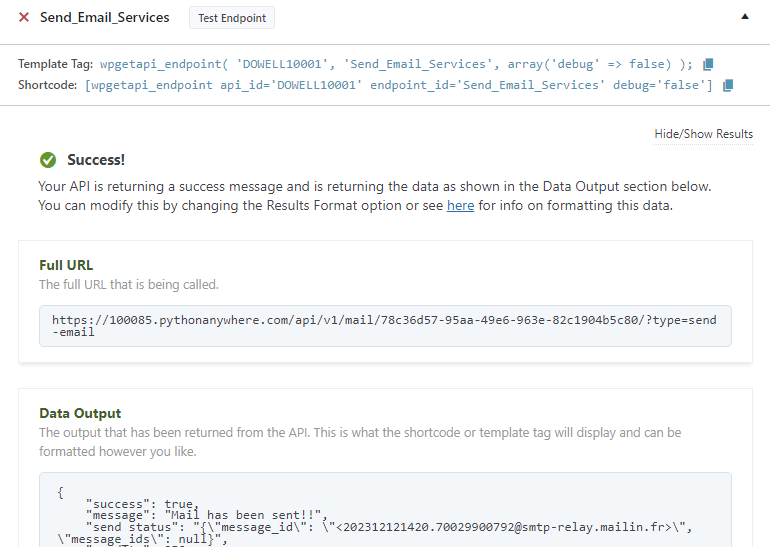
Step 3: To display the output fetched from the Mail API service, copy the shortcode provided by the plugin and add it onto your wordpress website page.

3. EMAIL FINDER SERVICES
Step 1: Establish the API endpoint with the inclusion of the API key, and configure the request body to contain the required POST fields.
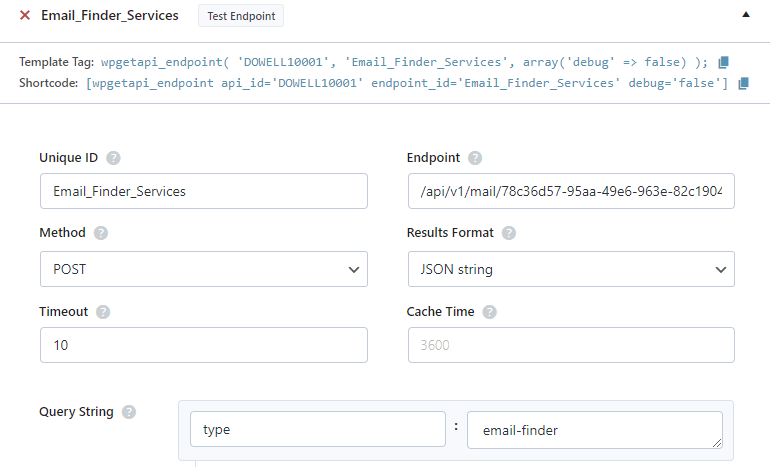
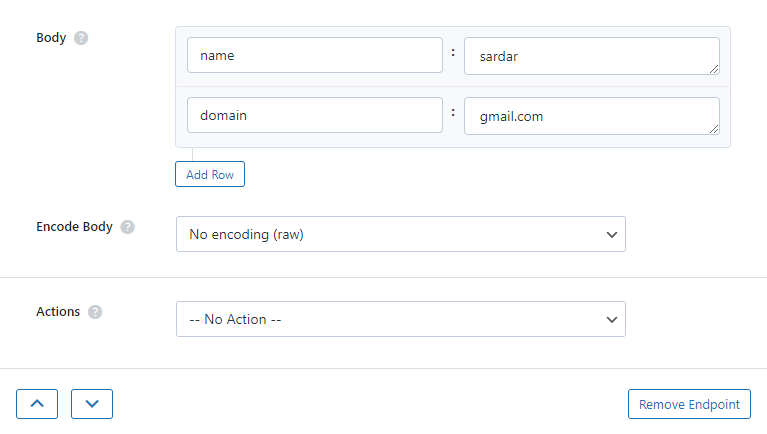
Step 2: Test the endpoint to obtain a jQuery response from the API. Ensure that the API is functioning correctly by sending a test request and examining the response.
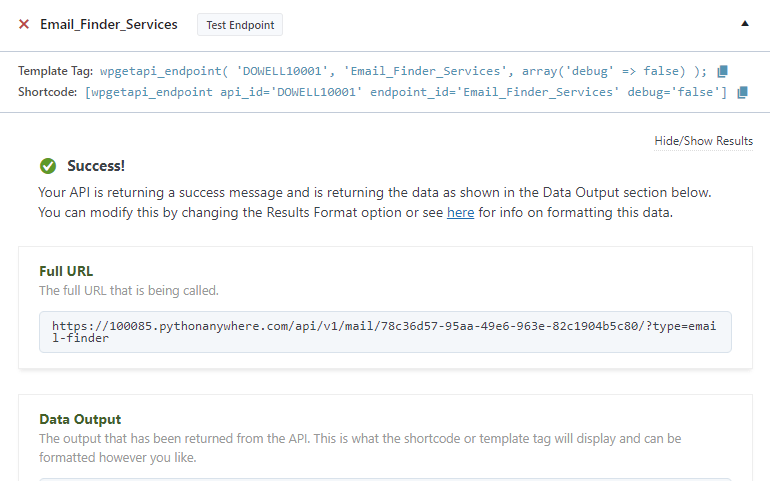
Step 3: To display the output fetched from the Mail API service, copy the shortcode provided by the plugin and add it onto your wordpress website page.


 Views Today : 5
 Views Last 30 days : 791
 Views This Year : 1306
 Total views : 6916