Dowell Living Lab Chat API
Dive into Innovation: Where Life Meets Tech at Dowell Living Lab

Dowell
Living Lab Chat API
Welcome to the Dowell Living Lab Chat API documentation! This API allows you to create chat rooms, send messages, and retrieve messages. Below, you’ll find explanations of the key features and how to use them.
Key Features

Creating a Chat Room
To create a chat room using the API, you need to provide an API key. The API key serves as an authentication mechanism and grants you access to the chat room creation endpoint. Once you have successfully created a chat room, you will receive a unique room identifier that you can use to interact with the room.
Sending Messages
Once you have a chat room, you can send messages to it using the API. Messages can be plain text, images, files, or any other supported content type. To send a message, you will need to specify the message content, the room’s identifier, and the sender’s information. Messages can be sent in real-time or as asynchronous messages, depending on your application’s requirements.

Retrieving Messages
Retrieving messages from a chat room is essential for displaying the chat history to users. You can use the API to retrieve messages based on different criteria, such as retrieving all messages in a room, messages sent by a specific user, or messages sent within a specific time frame. The retrieved messages can be displayed in your application’s user interface.
Real-Time Communication
Enable real-time communication between users by leveraging the API's capabilities for creating chat rooms and sending messages, fostering interactive and dynamic interactions within applications or platforms integrated with the API.
How Does it Work?
API Integration: Developers integrate the Dowell Living Lab Chat API into various platforms (Python, PHP, React, Flutter, WordPress) by sending HTTP requests to API endpoints using appropriate libraries or frameworks.
Authentication: Users authenticate themselves with the API using authentication tokens or credentials provided by the Dowell Living Lab Chat platform, ensuring secure access to chat room creation, message sending, and retrieval functionalities.
Endpoint Utilization: Developers utilize specific API endpoints for actions such as creating chat rooms, sending messages, and retrieving messages, passing relevant parameters and data in the request payloads to execute the desired functionalities within their applications or platforms.
Benefits of Using the Living Lab Chat API
Enhanced Collaboration: Foster seamless communication and collaboration among users in real-time, facilitating effective teamwork and information sharing.
Improved Engagement: Encourage user engagement by providing a platform for interactive discussions and exchanges, leading to increased participation and involvement.
Efficient Information Sharing: Streamline the sharing of information and ideas among participants, ensuring that messages are delivered promptly and accessible for reference.
Postman Documentation
For detailed API documentation, including endpoint descriptions, request and response examples, and authentication details, please refer to the API documentation
Dowell Living Lab Chat API Demonstrative Scenarios
In the following scenarios, Dowell will furnish comprehensive instructions on obtaining the Service key and guide you through the steps to use the API. You’ll find examples in various formats such as Python, PHP, React, Flutter, and WordPress in the tabs below. Feel free to explore the examples in each tab for practical insights.
Dowell Living Lab Chat API Use Cases
Dive into the world of Dowell Living Lab Chat API! Experience seamless collaboration in online learning platforms, robust customer support systems, and engaging virtual event platforms. Learn how to foster real-time discussions, provide prompt assistance, and enhance attendee engagement. Watch our video to see how it’s done!
Frequently Asked Questions (FAQs) about Dowell Living Lab Chat API
1. How do I create a chat room using the API?
To create a chat room, you need to provide your API key for authentication. Once authenticated, you’ll receive a unique room identifier that you can use to interact with the room.
2. What types of messages can I send with the API?
You can send plain text, images, files, or any other supported content type as messages using the API.
3. Is it possible to retrieve messages sent by a specific user?
Yes, you can retrieve messages sent by a specific user by specifying the user’s identifier or username in the API request.
4. Does the API support real-time messaging?
Yes, the API supports real-time messaging. You can send messages in real-time to chat rooms as well as retrieve messages in real-time.
5. How secure is the communication between my application and the Dowell Living Lab Chat API?
The API uses secure HTTPS protocol for communication, ensuring the confidentiality and integrity of data transmitted between your application and the API server.
6. What kind of support is available if I encounter any issues while using the API?
If you encounter any issues, have questions, or need assistance with Dowell Living Lab Chat API, you can contact the support team for prompt assistance. Contact us at Dowell@dowellresearch.uk
7. Are there any SDKs available for easier integration with the API?
Currently, there are no specific SDKs mentioned in the documentation. However, you can use the provided examples and documentation to integrate the API into your application.
8. Can I customize the appearance and behavior of the chat rooms in my application?
Yes, you can customize the appearance and behavior of the chat rooms in your application according to your requirements and design preferences.
9. Is there any documentation or support available for troubleshooting API integration issues?
Yes, the API documentation provides detailed information on endpoints, request payloads, and response formats. Additionally, you can contact the support team for further assistance.
10. What other APIs does Dowell UX Living Lab provide besides Living Lab Chat API?
Dowell UX Living Lab offers a wide range of APIs to enhance user experience and streamline various processes. To explore the full list of APIs available, including Dowell Email, Dowell Newsletter, Samanta Content Evaluator, and many more.
For more details and to explore the complete list of APIs provided by Dowell UX Living Lab, please visit our documentation page.
How To Get The API Key
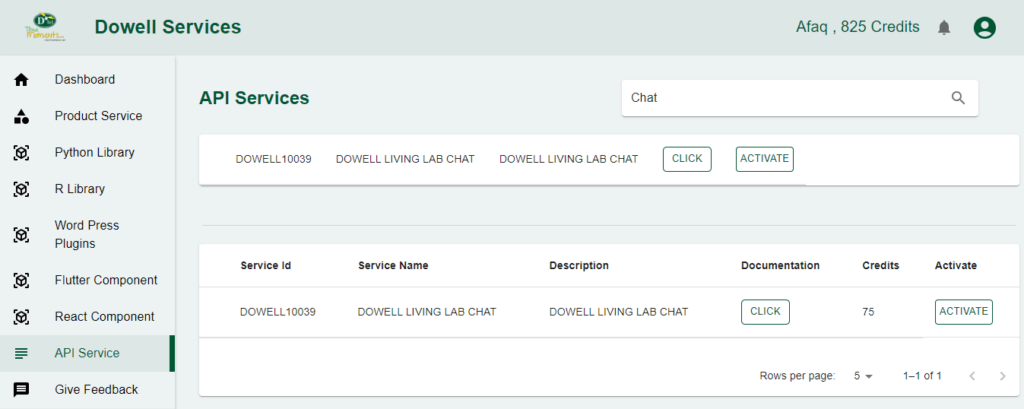
- Access the Dowellstore website through this link: https://dowellstore.org and login. Once on the website, navigate to the API service section and activate the DOWELL LIVING LAB CHAT API service. The API Key you need can be found in the dashboard, provided there as the service key. For more information follow the instructions in the videos found at the link below.
[How to get API key and redeem your voucher Step-by-Step Tutorial] - You can also find a step-by-step guide on how to get the API key and activate the API(s) by following this link Get The Service Key
- Then set the API KEY as part of the url parameter as shown below. Replace with your actual API key. The URL format: https://www.socialmediaautomation.uxlivinglab.online/api/v1/generate-sentences/
- Note: Make sure to activate your API from Dowell API Key System link provided above.
Python Example
1) Fetch Public Room
The provided Python script is designed to make an HTTP GET request to a specified URL and handle the response accordingly. The URL corresponds to a public room API endpoint with an optional API key. The script attempts to fetch data from the API and prints the result.
					import requests

url = "https://100096.pythonanywhere.com/api/v2/publicroom/?api_key=c2636d98-4f43-4be1-9e3b-47cdfcbe832b"

payload = {"name": "pchavda", "domain": "gmail.com"}

try:
    response = requests.get(url)

    if response.status_code == 201:
        print("Resource created successfully")
        # Optionally, you can also print or process the response data
        data = response.json()
        print(data)
    else:
        print(f"Request failed with status code: {response.status_code}")
        print(response.text)

except requests.exceptions.RequestException as e:
    print(f"Request failed with an exception: {e}")
2) Create Public Room
This Python script utilizes the requests library to send a POST request to a specified URL. The request includes a JSON payload containing organizational, product, and portfolio information. Upon successful creation (HTTP status code 201), it prints a success message along with the response data. In case of failure, it prints the status code and response text. The script is designed for interacting with the specified API endpoint to create a resource associated with a public room, using the provided API key.
					import requests

url = "https://100096.pythonanywhere.com/api/v2/publicroom/?api_key=c2636d98-4f43-4be1-9e3b-47cdfcbe832b"

payload = {
    "org_id": "01830367e332471aa8e7f6514b34da45",
    "product_name": "PUBLICCHAT",
    "portfolio_name": "01830367e332471aa8e7f6514b34da45PUBLICCHAT",
}

try:
    response = requests.post(url, json=payload)

    if response.status_code == 201:
        print("Resource created successfully")
        # Optionally, you can also print or process the response data
        data = response.json()
        print(data)
    else:
        print(f"Request failed with status code: {response.status_code}")
        print(response.text)

except requests.exceptions.RequestException as e:
    print(f"Request failed with an exception: {e}")
3) Get Message
This Python script utilizes the `requests` library to send a GET request to a specified URL, querying messages for a given room. The script includes error handling for both successful and unsuccessful responses, providing a brief message along with optional processing of the response data. The documentation should highlight its purpose in retrieving messages for a specific room via a RESTful API.
					import requests

url = "https://100096.pythonanywhere.com/api/v2/room-service/?type=get_messages&room_id=6579be812c536f8bcbd2ff43"

payload = {"name": "pchavda", "domain": "gmail.com"}

try:
    response = requests.get(url)

    if response.status_code == 201:
        print("Resource created successfully")
        # Optionally, you can also print or process the response data
        data = response.json()
        print(data)
    else:
        print(f"Request failed with status code: {response.status_code}")
        print(response.text)

except requests.exceptions.RequestException as e:
    print(f"Request failed with an exception: {e}")
4) Create Message
The payload includes details such as the room ID, message type, content, and author. Upon a successful request (HTTP status code 201), it prints “Resource created successfully” along with the response data. If the request fails, it prints the corresponding status code and response text. The script is wrapped in a try-except block to handle any exceptions that might occur during the request.
					import requests

url = "https://100096.pythonanywhere.com/api/v2/room-service/"

payload = {
    "room_id": "6579be812c536f8bcbd2ff43",
    "type": "create_message",
    "message_data": "<content of the message>",
    "side": False,
    "author": "<message author>",
    "message_type": "text",
}

try:
    response = requests.post(url, json=payload)

    if response.status_code == 201:
        print("Resource created successfully")
        # Optionally, you can also print or process the response data
        data = response.json()
        print(data)
    else:
        print(f"Request failed with status code: {response.status_code}")
        print(response.text)

except requests.exceptions.RequestException as e:
    print(f"Request failed with an exception: {e}")
PHP Example
1) Fetch Public Room
This PHP script uses the file_get_contents function to perform a GET request and handles the response, including error handling.
					<?php
$url = "https://100096.pythonanywhere.com/api/v2/publicroom/?api_key=c2636d98-4f43-4be1-9e3b-47cdfcbe832b";
$payload = ["name" => "pchavda", "domain" => "gmail.com"];

try {
    $response = file_get_contents($url);
    $data = json_decode($response, true);

    if ($data) {
        echo "Resource created successfully\n";
        print_r($data);
    } else {
        echo "Request failed\n";
        echo $response;
    }
} catch (Exception $e) {
    echo "Request failed with an exception: {$e->getMessage()}\n";
}
?>
2) Create Public Room
This PHP script performs a POST request and prints the response if successful; otherwise, it handles exceptions.
					<?php
$url = "https://100096.pythonanywhere.com/api/v2/publicroom/?api_key=c2636d98-4f43-4be1-9e3b-47cdfcbe832b";
$payload = [
    "org_id" => "01830367e332471aa8e7f6514b34da45",
    "product_name" => "PUBLICCHAT",
    "portfolio_name" => "01830367e332471aa8e7f6514b34da45PUBLICCHAT",
];

try {
    $options = [
        'http' => [
            'header'  => "Content-type: application/json\r\n",
            'method'  => 'POST',
            'content' => json_encode($payload),
        ],
    ];
    $context  = stream_context_create($options);
    $response = file_get_contents($url, false, $context);
    $data = json_decode($response, true);

    if ($data) {
        echo "Resource created successfully\n";
        print_r($data);
    } else {
        echo "Request failed\n";
        echo $response;
    }
} catch (Exception $e) {
    echo "Request failed with an exception: {$e->getMessage()}\n";
}
?>
3) Get Message
This PHP script performs a GET request to fetch messages for a room and prints the response if successful; otherwise, it handles exceptions.
					<?php
$url = "https://100096.pythonanywhere.com/api/v2/room-service/?type=get_messages&room_id=6579be812c536f8bcbd2ff43";
$payload = ["name" => "pchavda", "domain" => "gmail.com"];

try {
    $response = file_get_contents($url);
    $data = json_decode($response, true);

    if ($data) {
        echo "Resource fetched successfully\n";
        print_r($data);
    } else {
        echo "Request failed\n";
        echo $response;
    }
} catch (Exception $e) {
    echo "Request failed with an exception: {$e->getMessage()}\n";
}
?>
4) Create Message
This PHP script sends a POST request with JSON payload and prints the response if successful; otherwise, it handles exceptions.
					<?php
$url = "https://100096.pythonanywhere.com/api/v2/room-service/";
$payload = [
    "room_id" => "6579be812c536f8bcbd2ff43",
    "type" => "create_message",
    "message_data" => "<content of the message>",
    "side" => false,
    "author" => "<message author>",
    "message_type" => "text",
];

try {
    $options = [
        'http' => [
            'header' => 'Content-type: application/json',
            'method' => 'POST',
            'content' => json_encode($payload),
        ],
    ];

    $context = stream_context_create($options);
    $response = file_get_contents($url, false, $context);

    if ($response) {
        $data = json_decode($response, true);
        if ($data && $data['status'] == 201) {
            echo "Resource created successfully\n";
            print_r($data);
        } else {
            echo "Request failed\n";
            echo $response;
        }
    } else {
        echo "Request failed\n";
    }
} catch (Exception $e) {
    echo "Request failed with an exception: {$e->getMessage()}\n";
}
?>
React Example
1) Fetch Public Room
This React component uses the fetch API to perform an asynchronous GET request and handles the response, including error handling.
					import React, { useEffect } from 'react';

const MyComponent = () => {
  // React component using the fetch API for a GET request

  const url = "https://100096.pythonanywhere.com/api/v2/publicroom/?api_key=c2636d98-4f43-4be1-9e3b-47cdfcbe832b";
  const payload = { name: "pchavda", domain: "gmail.com" };

  useEffect(() => {
    const fetchData = async () => {
      try {
        // Sending an asynchronous GET request
        const response = await fetch(url);
        const data = await response.json();

        // Handling the response
        if (response.ok) {
          console.log("Resource created successfully");
          console.log(data);
        } else {
          console.log(`Request failed with status code: ${response.status}`);
          console.log(data);
        }
      } catch (error) {
        console.error(`Request failed with an exception: ${error.message}`);
      }
    };

    fetchData();
  }, []);

  return <div>Your React component content here</div>;
};

export default MyComponent;
2) Create Public Room
This React component uses the fetch API to perform an asynchronous POST request and logs the results.
					import React, { useEffect } from 'react';

const MyComponent = () => {
  const url = "https://100096.pythonanywhere.com/api/v2/publicroom/?api_key=c2636d98-4f43-4be1-9e3b-47cdfcbe832b";
  const payload = {
    org_id: "01830367e332471aa8e7f6514b34da45",
    product_name: "PUBLICCHAT",
    portfolio_name: "01830367e332471aa8e7f6514b34da45PUBLICCHAT",
  };

  useEffect(() => {
    const fetchData = async () => {
      try {
        const response = await fetch(url, {
          method: 'POST',
          headers: {
            'Content-Type': 'application/json',
          },
          body: JSON.stringify(payload),
        });
        const data = await response.json();

        if (response.ok) {
          console.log("Resource created successfully");
          console.log(data);
        } else {
          console.log(`Request failed with status code: ${response.status}`);
          console.log(data);
        }
      } catch (error) {
        console.error(`Request failed with an exception: ${error.message}`);
      }
    };

    fetchData();
  }, []);

  return <div>Your React component content here</div>;
};

export default MyComponent;
3) Get Message
This React component uses the fetch API to perform an asynchronous GET request for fetching messages and logs the results.
					import React, { useEffect } from 'react';

const MessageComponent = () => {
  const url = "https://100096.pythonanywhere.com/api/v2/room-service/?type=get_messages&room_id=6579be812c536f8bcbd2ff43";
  const payload = { name: "pchavda", domain: "gmail.com" };

  useEffect(() => {
    const fetchData = async () => {
      try {
        const response = await fetch(url);
        const data = await response.json();

        if (response.ok) {
          console.log("Resource fetched successfully");
          console.log(data);
        } else {
          console.log(`Request failed with status code: ${response.status}`);
          console.log(data);
        }
      } catch (error) {
        console.error(`Request failed with an exception: ${error.message}`);
      }
    };

    fetchData();
  }, []);

  return <div>Your React component content here</div>;
};

export default MessageComponent;
4) Create Message
This React component sends a POST request with JSON payload using the fetch API and logs the results.
					import React, { useEffect } from 'react';

const MyComponent = () => {
  const url = "https://100096.pythonanywhere.com/api/v2/room-service/";
const payload = {
    room_id: "6579be812c536f8bcbd2ff43",
    type: "create_message",
    message_data: "<content of the message>",
    side: false,
    author: "<message author>",
    message_type: "text",
  };

  useEffect(() => {
    const fetchData = async () => {
      try {
        const response = await fetch(url, {
          method: 'POST',
          headers: {
            'Content-Type': 'application/json',
          },
          body: JSON.stringify(payload),
        });

        const data = await response.json();

        if (response.ok && data.status === 201) {
          console.log("Resource created successfully");
          console.log(data);
        } else {
          console.log(`Request failed with status code: ${response.status}`);
          console.log(data);
        }
      } catch (error) {
        console.error(`Request failed with an exception: ${error.message}`);
      }
    };

    fetchData();
  }, []);

  return <div>Your React component content here</div>;
};

export default MyComponent;
Flutter Example
1) Fetch Public Room
This Dart script in Flutter uses the http package to perform an asynchronous GET request and handles the response, including error handling.
					import 'dart:convert';
import 'package:http/http.dart' as http;
void main() async {
  // Dart script in Flutter for performing a GET request

  final url = "https://100096.pythonanywhere.com/api/v2/publicroom/?api_key=c2636d98-4f43-4be1-9e3b-47cdfcbe832b";
  final payload = {"name": "pchavda", "domain": "gmail.com"};

  try {
    // Sending an asynchronous GET request
    final response = await http.get(Uri.parse(url));
    final data = json.decode(response.body);

    // Handling the response
    if (response.statusCode == 200) {
      print("Resource created successfully");
      print(data);
    } else {
      print("Request failed with status code: ${response.statusCode}");
      print(data);
    }
  } catch (error) {
    print("Request failed with an exception: $error");
  }
}
2) Create Public Room
This Dart script in Flutter performs an asynchronous POST request using the http package and prints the results.
					import 'dart:convert';
import 'package:http/http.dart' as http;

void main() async {
  final url = "https://100096.pythonanywhere.com/api/v2/publicroom/?api_key=c2636d98-4f43-4be1-9e3b-47cdfcbe832b";
  final payload = {
    "org_id": "01830367e332471aa8e7f6514b34da45",
    "product_name": "PUBLICCHAT",
    "portfolio_name": "01830367e332471aa8e7f6514b34da45PUBLICCHAT",
  };

  try {
    final response = await http.post(
      Uri.parse(url),
      headers: {"Content-Type": "application/json"},
      body: jsonEncode(payload),
    );
    final data = json.decode(response.body);

    if (response.statusCode == 201) {
      print("Resource created successfully");
      print(data);
    } else {
      print("Request failed with status code: ${response.statusCode}");
      print(data);
    }
  } catch (error) {
    print("Request failed with an exception: $error");
  }
}
3) Get Message
This Dart script in Flutter performs an asynchronous GET request using the http package to fetch messages for a room and prints the results.
import 'dart:convert';
import 'package:http/http.dart' as http;
void main() async {
final url = "https://100096.pythonanywhere.com/api/v2/room-service/?type=get_messages&room_id=6579be812c536f8bcbd2ff43";
final payload = {"name": "pchavda", "domain": "gmail.com"};
try {
final response = await http.get(Uri.parse(url));
final data = json.decode(response.body);
if (response.statusCode == 200) {
print("Resource fetched successfully");
print(data);
} else {
print("Request failed with status code: ${response.statusCode}");
print(data);
}
} catch (error) {
print("Request failed with an exception: $error");
}
}
4) Create Message
This Dart script in Flutter sends a POST request with JSON payload using the http package and prints the results.
import 'dart:convert';
import 'package:http/http.dart' as http;
void main() async {
final url = "https://100096.pythonanywhere.com/api/v2/room-service/";
final payload = {
"room_id": "6579be812c536f8bcbd2ff43",
"type": "create_message",
"message_data": "<content of the message>",
"side": false,
"author": "<message author>",
"message_type": "text",
};
try {
final response = await http.post(
Uri.parse(url),
headers: {"Content-Type": "application/json"},
body: jsonEncode(payload),
);
final data = json.decode(response.body);
if (response.statusCode == 201 && data['status'] == 201) {
print("Resource created successfully");
print(data);
} else {
print("Request failed with status code: ${response.statusCode}");
print(data);
}
} catch (error) {
print("Request failed with an exception: $error");
}
}
WordPress Example
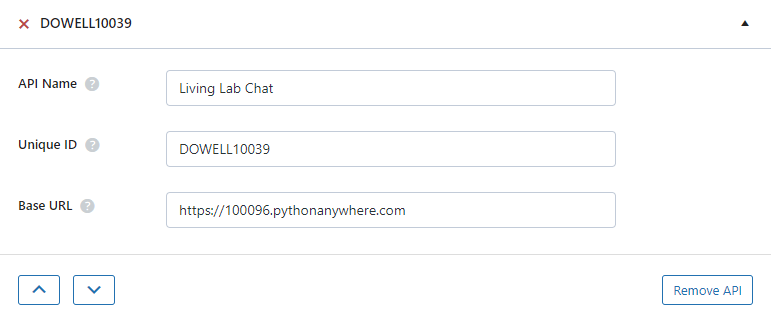
Set up the API name, unique ID and the base url(below). It’s a prerequisite to have WP-GET API plugin installed in your wordpress website
1) Fetch Public Room
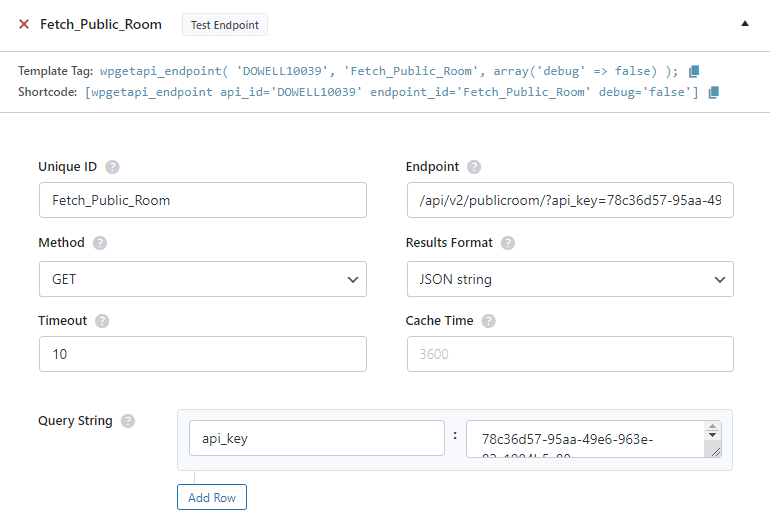
Step 1: Establish the API endpoint with the inclusion of the API key, and configure the request body to contain the required POST fields.
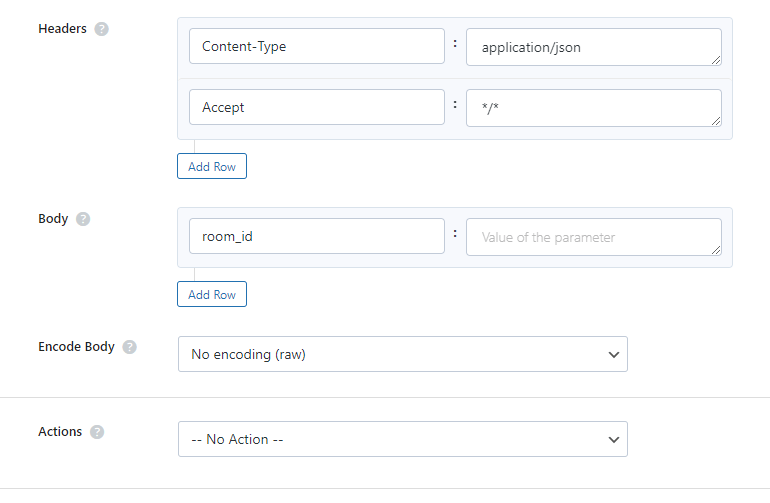
Step 2: Test the endpoint to obtain a jQuery response from the API. Ensure that the API is functioning correctly by sending a test request and examining the response.
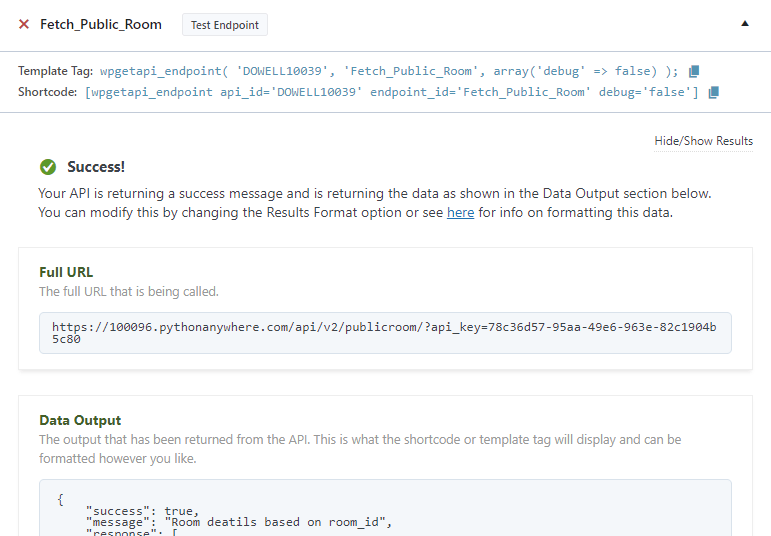
Step 3: To display the output fetched from the API service, copy the shortcode provided by the plugin and add it onto your wordpress website page.

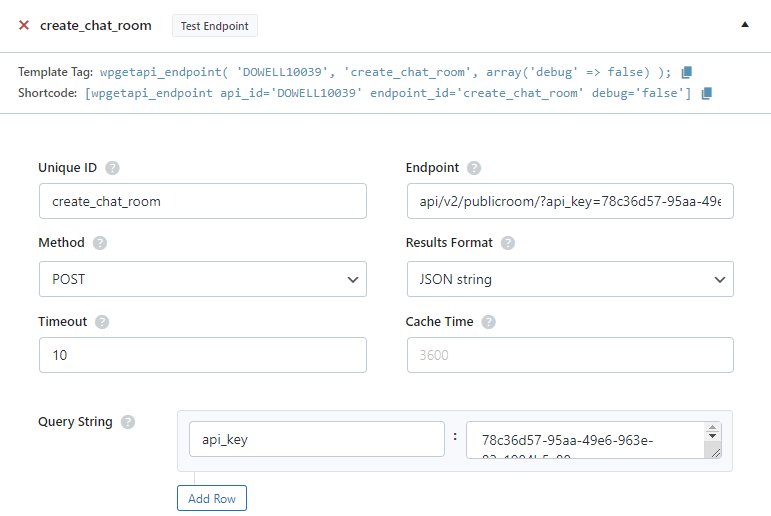
2) Create Public Room
Step 1: Establish the API endpoint with the inclusion of the API key, and configure the request body to contain the required POST fields.
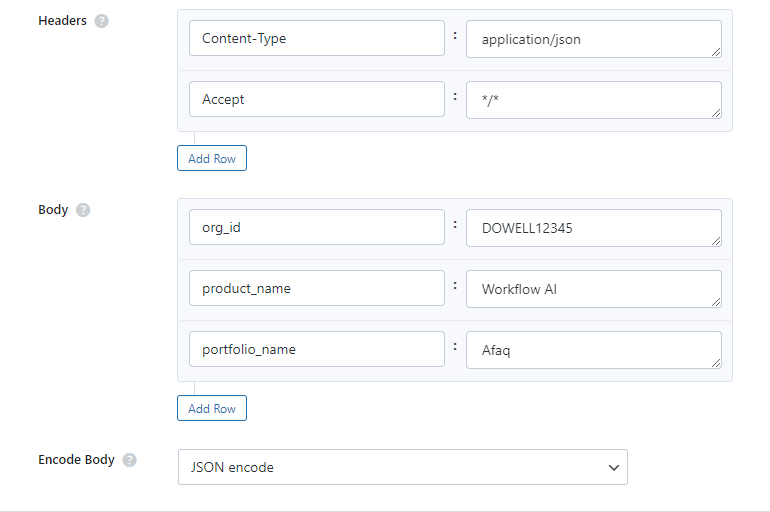
Step 2: Test the endpoint to obtain a jQuery response from the API. Ensure that the API is functioning correctly by sending a test request and examining the response.
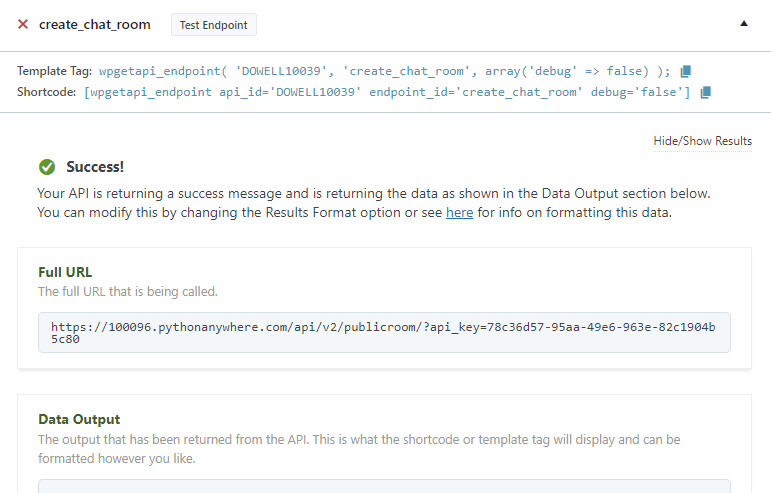
Step 3: To display the output fetched from the API service, copy the shortcode provided by the plugin and add it onto your wordpress website page.

3) Get Message
Step 1: Establish the API endpoint with the inclusion of the API key, and configure the request body to contain the required POST fields.
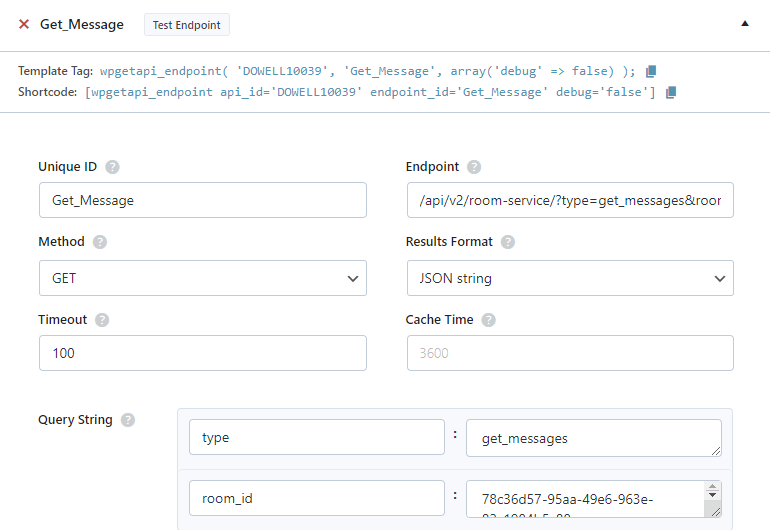
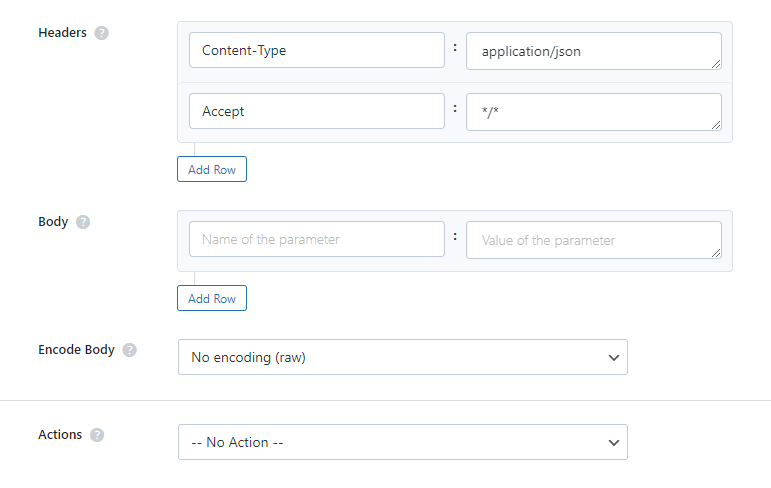
Step 2: Test the endpoint to obtain a jQuery response from the API. Ensure that the API is functioning correctly by sending a test request and examining the response.
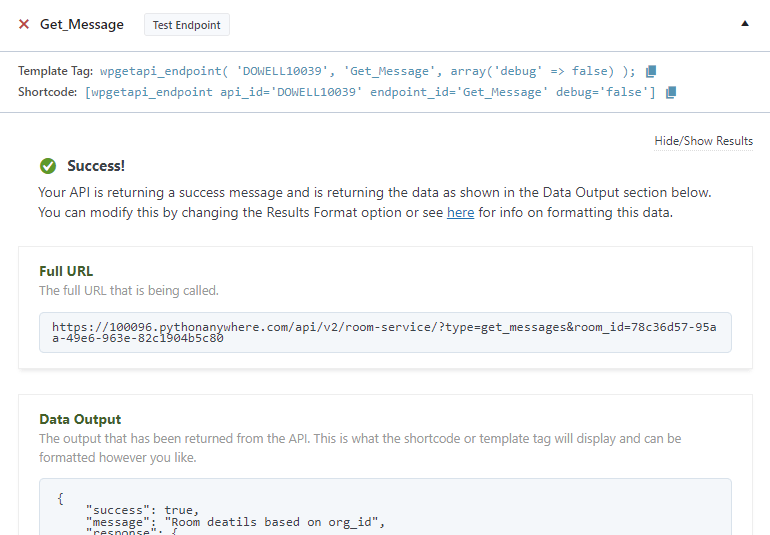
Step 3: To display the output fetched from the API service, copy the shortcode provided by the plugin and add it onto your wordpress website page.

4) Create Message
Step 1: Establish the API endpoint with the inclusion of the API key, and configure the request body to contain the required POST fields.
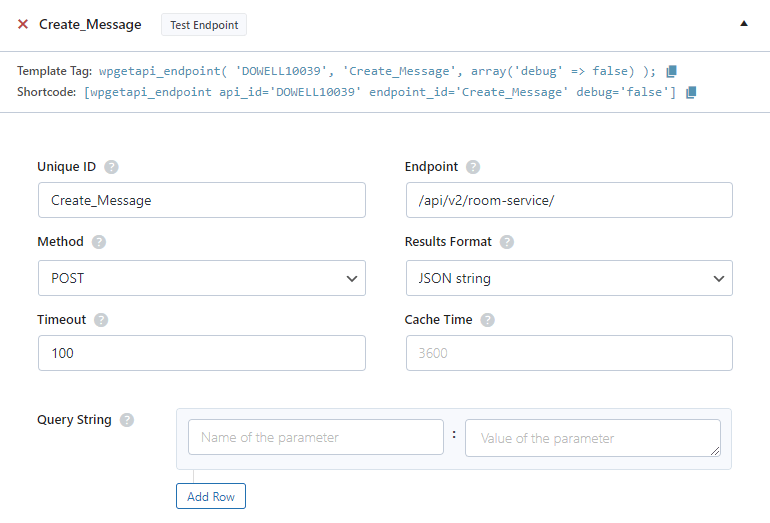
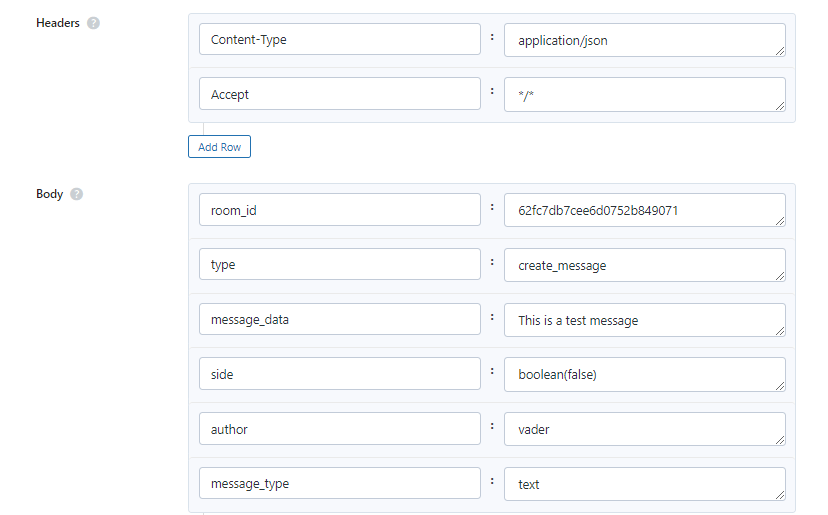
Step 2: Test the endpoint to obtain a jQuery response from the API. Ensure that the API is functioning correctly by sending a test request and examining the response.
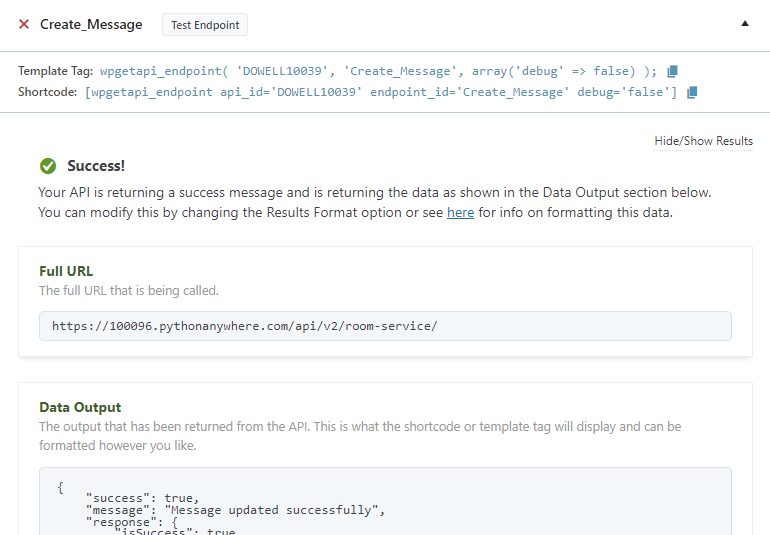
Step 3: To display the output fetched from the API service, copy the shortcode provided by the plugin and add it onto your wordpress website page.


 Views Today : 40
 Views Last 30 days : 749
 Views This Year : 763
 Total views : 6373