Dowell Login API
Your gateway to Ux Living Lab: Dowell Login API

Dowell Login API
The Dowell Login API optimizes the login journey, ensuring that users effortlessly access the Ux Living Lab platform. Whether you’re a researcher, designer, or stakeholder, this API empowers you to interact with the platform seamlessly. It eliminates the need for complex and time-consuming login procedures, allowing you to focus on what truly matters—your work within the Ux Living Lab.
This API provides a secure and reliable means of authentication, safeguarding sensitive user data and privacy. It incorporates robust security measures to protect against unauthorized access, making it a trustworthy choice for your Ux Living Lab account
Key Features

Effortless Authentication
Simplifies the login process, saving users time and frustration by eliminating complex procedures.

Seamless Integration
Allows researchers, designers, and stakeholders to interact smoothly with the Ux Living Lab platform without interruptions or compatibility issues.

Secure Authentication
Incorporates robust security measures to ensure the safety of user data, providing a trustworthy environment for sensitive information.

Reliable Performance
Offers a reliable authentication system, minimizing downtime and ensuring uninterrupted access to the Ux Living Lab platform for users.
Initiate
To use the Dowell Login API, follow these steps:
- Sign Up: Create an account on our platform and obtain your API key.
- Installation: Install the API client library for your preferred programming language (Python, JavaScript, etc.).
- Authentication: Use your API key to authenticate your requests.
- API Endpoint: Make requests to the designated API endpoint with your input data.
- Receive Topics: Retrieve the generated topics from the API response.
For detailed instructions, code examples, and endpoint specifications, please refer to the API Documentation.
Postman Documentation
For detailed API documentation, including endpoint descriptions, request and response examples, and authentication details, please refer to the API documentation
Dowell Login API Demonstrative Scenarios
In the following scenarios, Dowell will furnish comprehensive instructions on obtaining the Service key and guide you through the steps to use the API. You’ll find examples in various formats such as Python, PHP, React, Flutter, and WordPress in the tabs below. Feel free to explore the examples in each tab for practical insights.
Dowell Login API Use Cases
Dive into the world of simplicity with Dowell’s Login API! Easily access your UX Living Lab account hassle-free. Discover seamless login experiences and unlock the gateway to explore our innovative products and services. Watch our captivating video to witness the magic unfold!
Frequently Asked Questions (FAQs) about Dowell Login API
1. What is the purpose of the Dowell Login API?
The Dowell Login API is designed to streamline the login process for users of the Ux Living Lab platform, ensuring effortless access while maintaining security.
2. Is the Dowell Login API secure?
Yes, the API offers secure authentication mechanisms and employs robust security measures to safeguard user data and privacy.
3. What are the mandatory fields required for using the Dowell Login API?
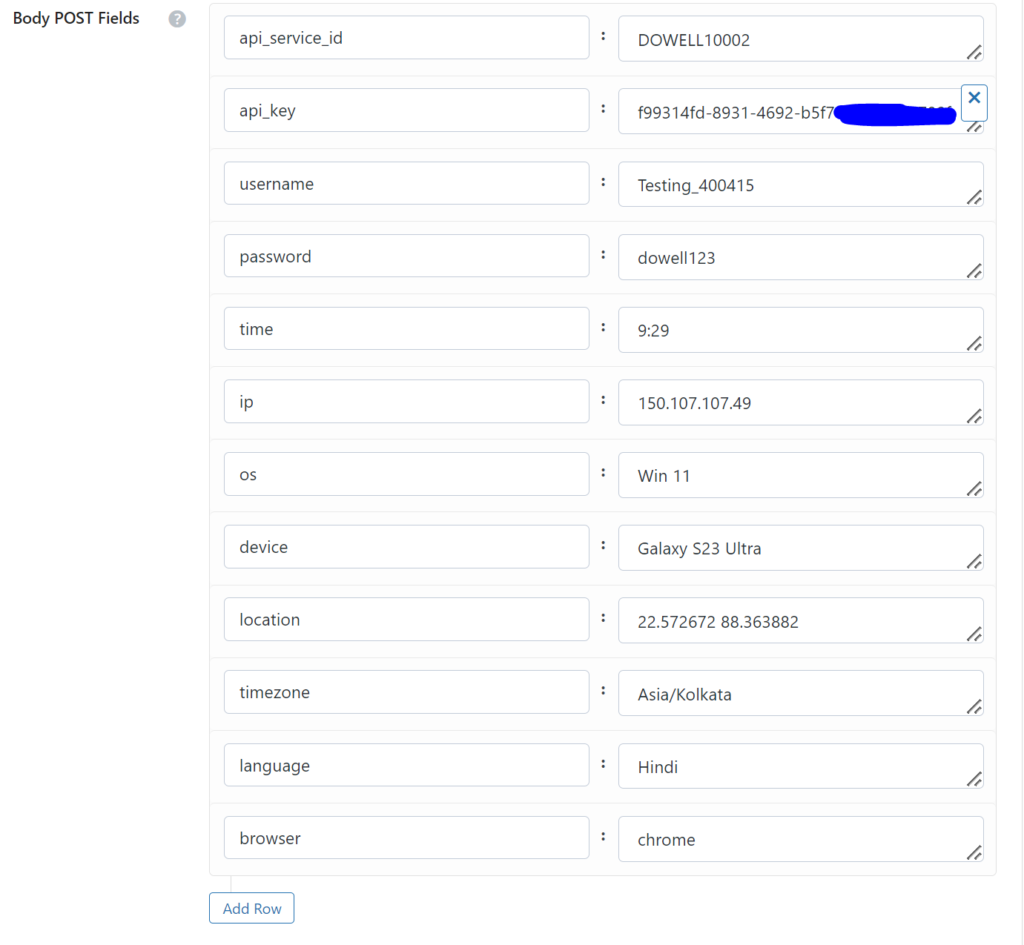
Mandatory fields include api_service_id, api_key, username, password, time, ip, os, location, and timezone.
4. Can I provide optional fields in my API request?
Yes, optional fields such as language, browser, and device can be provided if needed.
5. How can I ensure the security of my API key?
Keep your API key confidential and avoid sharing it publicly. Use secure methods for storing and transmitting the key.
6. What kind of support is available if I encounter any issues while using the API?
If you encounter any issues, have questions, or need assistance with Dowell Login API, you can contact the support team for prompt assistance. Contact us at Dowell@dowellresearch.uk
7. Can I integrate the Dowell Login API with my existing authentication system?
Yes, you may be able to integrate the API with your existing authentication system, depending on its compatibility.
8. What happens if my request to the API endpoint fails?
If your request to the API endpoint fails, ensure that all required fields are correctly filled out and that your internet connection is stable.
9. Are there any restrictions on the length or format of the password?
The documentation does not specify any restrictions on the length or format of the password. However, it’s recommended to use strong, unique passwords for security purposes.
10. What other APIs does Dowell UX Living Lab provide besides Login API?
Dowell UX Living Lab offers a wide range of APIs to enhance user experience and streamline various processes. To explore the full list of APIs available, including Dowell Email, Dowell Newsletter, Samanta Content Evaluator, and many more.
For more details and to explore the complete list of APIs provided by Dowell UX Living Lab, please visit our documentation page.
How To Get The API Key
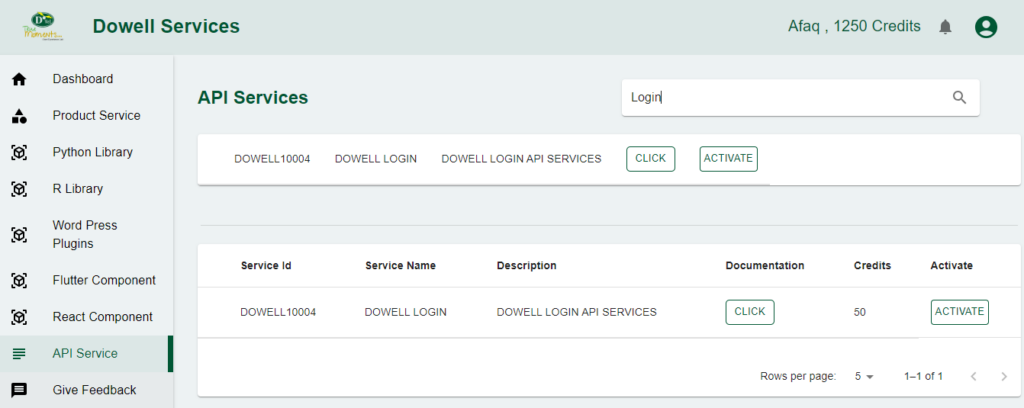
- Access the Dowellstore website through this link: https://dowellstore.org and login. Once on the website, navigate to the API service section and activate the DOWELL LOGIN API service. The API Key you need can be found in the dashboard, provided there as the service key. For more information follow the instructions in the videos found at the link below.
[How to get API key and redeem your voucher Step-by-Step Tutorial] - You can also find a step-by-step guide on how to get the API key and activate the API(s) by following this link Get The Service Key
- Then set the API KEY as part of the url parameter as shown below. Replace with your actual API key. The URL format: https://www.socialmediaautomation.uxlivinglab.online/api/v1/generate-sentences/
- Note: Make sure to activate your API from Dowell API Key System link provided above.
Python Example
The provided Python script sends a POST request to a login API endpoint, submitting user authentication details and additional device information. If the request is successful (status code 201), it prints a success message along with the response data; otherwise, it outputs an error message along with the status code and the content of the response.
					import requests

url = "https://100014.pythonanywhere.com/api/loginapi/"

payload = {
    "api_service_id": "DOWELL10004",
    "api_key": "c2636d98-4f43-4be1-9e3b-47cdfcbe832b",
    "username": "Testing_400410",
    "password": "dowell123",
    "time": "12:14",
    "ip": "150.107.107.49",
    "os": "Win 11",
    "device": "Galaxy S23 Ultra",
    "location": "22.572672 88.363882",
    "timezone": "Asia/Kolkata",
    "language": "Hindi",
    "browser": "chrome",
}

response = requests.post(url, json=payload)

if response.status_code == 201:
    print("Resource created successfully")
    # Optionally, you can also print or process the response data
    data = response.json()
    print(data)
else:
    print(f"Request failed with status code: {response.status_code}")

print(f"Request failed with status code: {response.status_code}")
print(response.text)
PHP Example
This PHP script sends a POST request to the specified URL, containing a payload with user authentication and device information. It uses the file_get_contents function and stream context to handle the HTTP request. The script then processes the response, decoding it from JSON and printing the success message along with the received data if the request is successful; otherwise, it outputs a failure message with the status code.
					<?php
$url = "https://100014.pythonanywhere.com/api/loginapi/";

$payload = array(
    "api_service_id" => "DOWELL10004",
    "api_key" => "c2636d98-4f43-4be1-9e3b-47cdfcbe832b",
    "username" => "Testing_400410",
    "password" => "dowell123",
    "time" => "12:14",
    "ip" => "150.107.107.49",
    "os" => "Win 11",
    "device" => "Galaxy S23 Ultra",
    "location" => "22.572672 88.363882",
    "timezone" => "Asia/Kolkata",
    "language" => "Hindi",
    "browser" => "chrome",
);

$options = array(
    'http' => array(
        'header' => "Content-Type: application/json\r\n",
        'method' => 'POST',
        'content' => json_encode($payload),
    ),
);

$context = stream_context_create($options);
$response = file_get_contents($url, false, $context);

if ($response !== false) {
    $data = json_decode($response, true);
    if ($data && isset($data['status']) && $data['status'] == 'success') {
        echo "Resource created successfully\n";
        print_r($data);
    } else {
        echo "Request failed with status: " . $data['status'] . "\n";
    }
} else {
    echo "Request failed.\n";
}

?>
React Example
This React component uses the `useEffect` hook to perform an asynchronous HTTP POST request to a specified URL. It sends a payload containing authentication and user data, logs the success or failure of the request, and displays relevant data in the console. The component renders a basic div placeholder for the actual content.
					import React, { useEffect } from 'react';

const YourComponent = () => {
  useEffect(() => {
    const fetchData = async () => {
      const url = "https://100014.pythonanywhere.com/api/loginapi/";

      const payload = {
        api_service_id: "DOWELL10004",
        api_key: "c2636d98-4f43-4be1-9e3b-47cdfcbe832b",
        username: "Testing_400410",
        password: "dowell123",
        time: "12:14",
        ip: "150.107.107.49",
        os: "Win 11",
        device: "Galaxy S23 Ultra",
        location: "22.572672 88.363882",
        timezone: "Asia/Kolkata",
        language: "Hindi",
        browser: "chrome",
      };

      try {
        const response = await fetch(url, {
          method: 'POST',
          headers: {
            'Content-Type': 'application/json',
          },
          body: JSON.stringify(payload),
        });

        if (response.ok) {
          console.log("Resource created successfully");
          const data = await response.json();
          console.log(data);
        } else {
          console.error(`Request failed with status code: ${response.status}`);
          const errorData = await response.json();
          console.error(errorData);
        }
      } catch (error) {
        console.error("An error occurred:", error);
      }
    };

    fetchData();
  }, []); // Make sure to provide dependencies or adjust accordingly

  return (
    <div>
      {/* Your React component content */}
    </div>
  );
};

export default YourComponent;
Flutter Example
This Dart code sends a POST request to a login API endpoint, providing a JSON payload with authentication details. It then processes the response, printing “Resource created successfully” if the status code is 201, and displaying detailed error information otherwise. The code uses the `http` package for HTTP requests and showcases error handling in an asynchronous environment.
					import 'dart:convert';
import 'package:http/http.dart' as http;

void main() {
  final url = Uri.parse("https://100014.pythonanywhere.com/api/loginapi/");

  Map<String, dynamic> payload = {
    "api_service_id": "DOWELL10004",
    "api_key": "c2636d98-4f43-4be1-9e3b-47cdfcbe832b",
    "username": "Testing_400410",
    "password": "dowell123",
    "time": "12:14",
    "ip": "150.107.107.49",
    "os": "Win 11",
    "device": "Galaxy S23 Ultra",
    "location": "22.572672 88.363882",
    "timezone": "Asia/Kolkata",
    "language": "Hindi",
    "browser": "chrome",
  };

  fetchData(url, payload);
}

void fetchData(Uri url, Map<String, dynamic> payload) async {
  try {
    final response = await http.post(
      url,
      headers: {"Content-Type": "application/json"},
      body: jsonEncode(payload),
    );

    if (response.statusCode == 201) {
      print("Resource created successfully");
      // Optionally, you can also print or process the response data
      Map<String, dynamic> data = jsonDecode(response.body);
      print(data);
    } else {
      print("Request failed with status code: ${response.statusCode}");
      print(response.body);
    }
  } catch (error) {
    print("Request failed with an exception: $error");
  }
}
WordPress Example
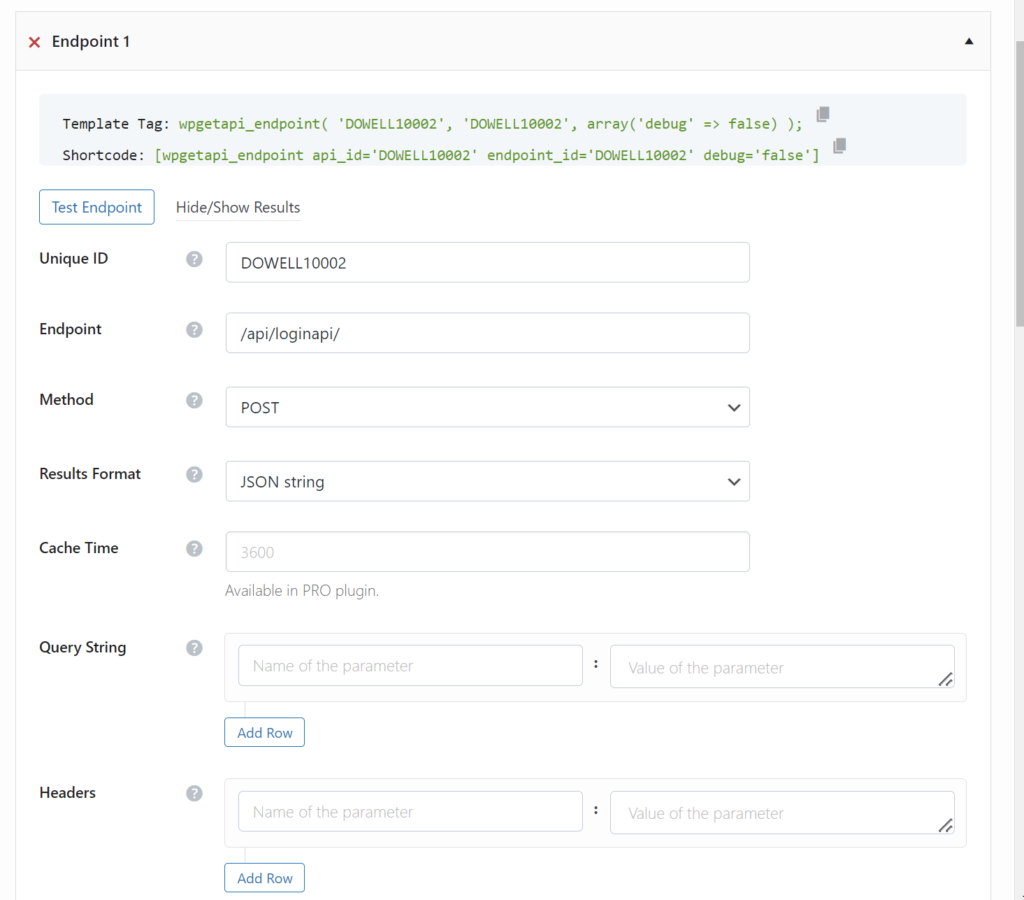
Step 1 : Set up the API name and the base url. It’s a prerequisite to have WP-GET API installed in your wordpress API.

Step 2: Set up the api endpoint and the request body.The request should have the necessary body fields.
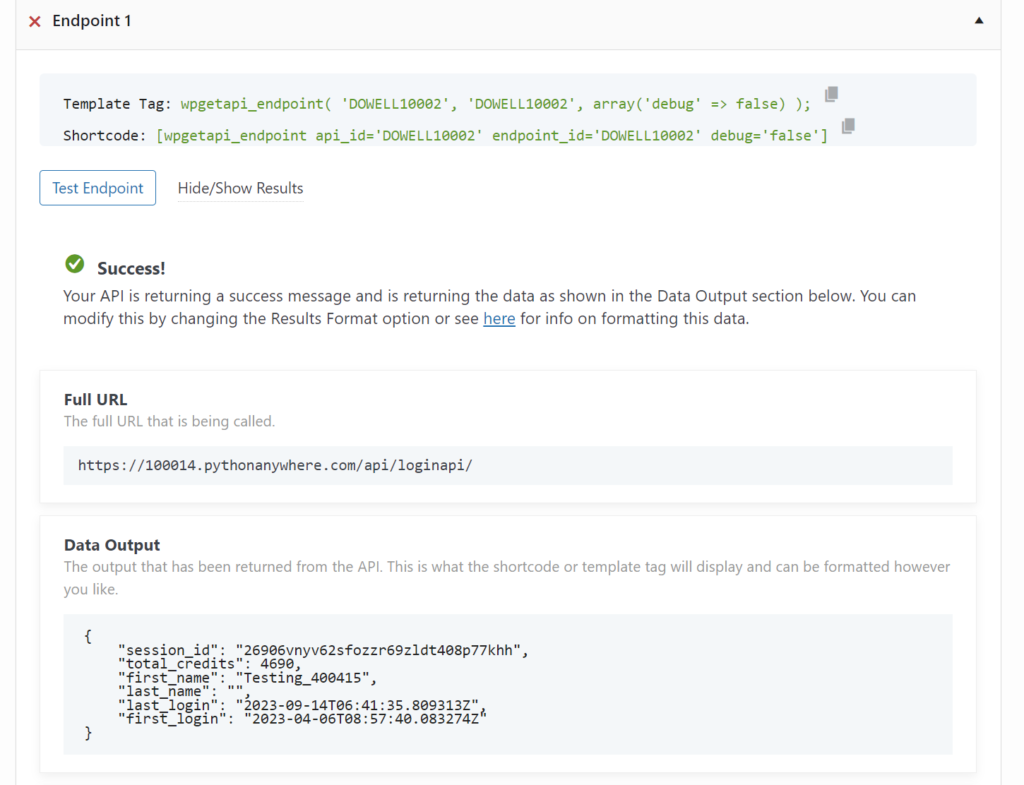
Step 3: Test Endpoint and you should receive the response as shown below:

D’Well Research validates and explores each stage of open innovation using user experience research from the field to support user-centered product design of medium and large companies globally.
DOWELL WEBSITES
QUICK LINKS
Our Visitors
 Views Today : 1
 Views Last 30 days : 326
 Views This Year : 948
 Total views : 3872