Dowell Payments API
Where innovation meets reliability: Dowell Payments API

Dowell
Payments API
The Payment API is a handy tool for integrating various payment gateways seamlessly into your system. It simplifies the process of handling payments online, ensuring smooth transactions for both you and your customers.

Dowell Payment Solution
1. Managing payments in e-comm sites, mobile apps and web apps
2. Automated price conversions based on visitor locations
3. Automated price conversions based on exchange rate and purchasing power parity
4. Connecting payment bank gateways in respective countries
5. Database can hold 1 Trillion transactions in multi-dimensional structure
6. Facility to store data in 50+ countries worldwide in one client account
7. Live reports with time series optimisation for payments
8. Scalable to branch, shop, country, category and customer levels with multi-currencies
9. API integration to your existing software interface
10. 24/7 support from Dowell
Key Features

Versatile
The Payment API offers compatibility with multiple payment gateways, giving you flexibility in choosing the one that best suits your needs.
Simplicity
It streamlines the payment process, making it easier for you to manage transactions.

Reliablity
Reliability: Trustworthy payment gateways ensure secure and reliable transactions for you and your customers.

Integration
Seamlessly integrate the Payment API into your existing systems with minimal hassle.
How Does it Work?
- Choose your preferred payment gateway from the available options.
- Integrate the Payment API into your system using simple steps provided in the documentation.
- Start processing payments seamlessly through your chosen gateway.
Benefits of Using the Payment API
- Efficiency: Simplifies payment processes, saving you time and effort.
- Flexibility: Compatible with various payment gateways, allowing you to adapt to changing needs.
- Convenience: Easy integration and user-friendly interface make handling payments hassle-free.
Payment Options
We offer a variety of payment gateways for our Payment API, providing flexibility and choice for our users. Each gateway supports payments in local currency across multiple countries. To utilize a specific gateway:
Initialization:
- Make a POST request with gateway credentials, price, currency_code, product name, callback URL, and mode (for testing or production).
Approval and Payment ID:
- Upon successful initialization, receive an approval URL and payment ID.
Payment Completion:
- Redirect the user to the approval URL to complete the payment.
Payment Verification:
- Verify the payment status by making a POST request with the payment ID.
Confirmation:
- Receive a confirmation message and payer details upon successful payment.
This workflow applies to all supported payment gateways, ensuring a seamless integration process.
Postman Documentation
For detailed API documentation, including endpoint descriptions, request and response examples, and authentication details, please refer to the API documentation
Dowell Payments API Demonstrative Scenarios
In the following scenarios, Dowell will furnish comprehensive instructions on obtaining the Service key and guide you through the steps to use the API. You’ll find examples in various formats such as Python, PHP, React, Flutter, and WordPress in the tabs below. Feel free to explore the examples in each tab for practical insights.
Dowell Payment API Use Cases
Dive into the world of seamless online payments with Dowell Payment API! Discover how to securely process transactions using Stripe, or boost conversion rates with PayPal. From customizable forms to effortless management, explore the possibilities and revolutionize your online payment experience. Watch now for a game-changing demo!
Frequently Asked Questions (FAQs) about Dowell Payments API
1. Can I use Dowell Payments API for processing payments in different currencies?
Yes, both Stripe and PayPal endpoints support paying in local currency across various countries.
2. What format should the price be in for Stripe and PayPal requests?
Stripe requests support whole numbers for the price, whereas PayPal requests support prices with up to two decimal points.
3. How do I initialize a payment using Stripe?
You can initialize a payment using Stripe by making a POST request with the necessary parameters including the Stripe key, price, currency code, product name, and callback URL to the Stripe endpoint.
4. What is the purpose of the callback URL in payment initialization?
The callback URL is where the user will be redirected after completing the payment process, allowing for further verification.
5. How do I initialize a payment using PayPal?
To initialize a payment using PayPal, make a POST request with the PayPal client ID, PayPal secret key, price, currency code, product name, callback URL, and mode to the PayPal endpoint.
6. What kind of support is available if I encounter any issues while using the API?
If you encounter any issues, have questions, or need assistance with Dowell Payments API, you can contact the support team for prompt assistance. Contact us at Dowell@dowellresearch.uk
7. What is the purpose of the mode parameter in PayPal requests?
The mode parameter allows you to specify whether you want to use sandbox mode for testing or live mode for actual transactions.
8. Can I test Dowell Payments API without making actual transactions?
Yes, you can use the sandbox mode provided by PayPal and Stripe for testing purposes without conducting real transactions.
9. How secure is Dowell Payments API?
Dowell Payments API utilizes trusted payment gateways such as Stripe and PayPal, ensuring secure processing of transactions.
10. What other APIs does Dowell UX Living Lab provide besides Payments API?
Dowell UX Living Lab offers a wide range of APIs to enhance user experience and streamline various processes. To explore the full list of APIs available, including Dowell Email, Dowell Newsletter, Samanta Content Evaluator, and many more.
For more details and to explore the complete list of APIs provided by Dowell UX Living Lab, please visit our documentation page.
How To Get The API Key
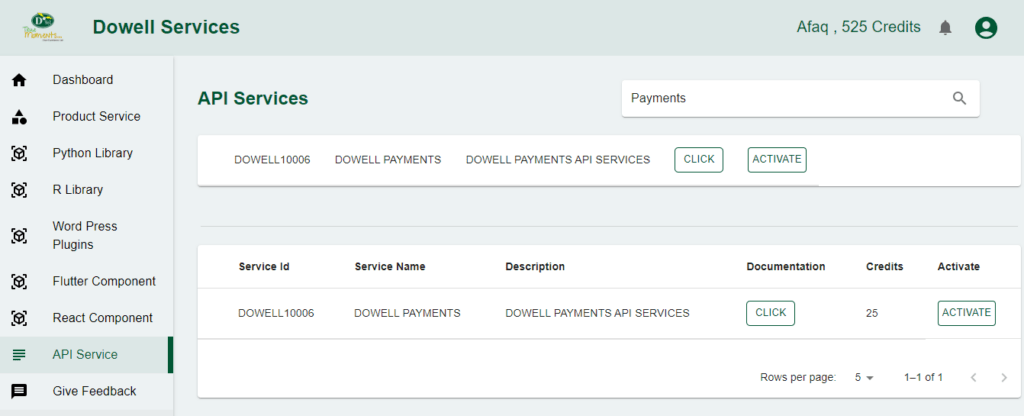
- Access the Dowellstore website through this link: https://dowellstore.org and login. Once on the website, navigate to the API service section and activate the DOWELL PAYMENTS API service. The API Key you need can be found in the dashboard, provided there as the service key. For more information follow the instructions in the videos found at the link below.
[How to get API key and redeem your voucher Step-by-Step Tutorial] - You can also find a step-by-step guide on how to get the API key and activate the API(s) by following this link Get The Service Key
- Then set the API KEY as part of the url parameter as shown below. Replace with your actual API key. The URL format: https://www.socialmediaautomation.uxlivinglab.online/api/v1/generate-sentences/
- Note: Make sure to activate your API from Dowell API Key System link provided above.
Python Example
1) initialize Payment (Stripe)
This Python script initiates a payment using the Stripe API. It sends a POST request to a specified endpoint with details such as the Stripe API key, price, product name, currency code, and callback URL. The script handles the response, printing the success message along with the response data if the payment initiation is successful.
					# Import the requests module for making HTTP requests
import requests

# Define the URL for the API endpoint
url = "https://100088.pythonanywhere.com/api/stripe/initialize/public/c2636d98-4f43-4be1-9e3b-47cdfcbe832b"

# Prepare the payload to be sent in the request
payload = {
    "stripe_key": "sk_test_51OMqgjSAlnoZcV3QLfDEzStUTVd54S86kdVyFK7jgfTGkmbpmsl5eehODOI6ZzkbEhhFdT0JjEAIv9LzFKJszQhE00Mb7Aq2A5",
    "price": 500,
    "product": "product name",
    "currency_code": "usd",
    "callback_url": "https://www.google.com",
}

try:
    # Send a POST request to the specified URL with the payload
    response = requests.post(url, json=payload)

    # Check if the request was successful
    if response.status_code == 201:
        # If successful, print a success message
        print("Resource created successfully")

        # Optionally, you can also print or process the response data
        data = response.json()
        print(data)
    else:
        # If the request failed, print the status code and response text
        print(f"Request failed with status code: {response.status_code}")
        print(response.text)

# Handle any exceptions that might occur during the request
except requests.exceptions.RequestException as e:
    # If an exception occurs, print the error message
    print(f"Request failed with an exception: {e}")
2) verify Payment (Stripe)
This Python script verifies a payment made through Stripe. It sends a POST request to a specific endpoint with the Stripe API key and the payment ID. If the verification is successful (status code 201), it prints a success message along with the response data; otherwise, it prints the status code and response text.
					import requests

# Define the URL for the API endpoint
url = "https://100088.pythonanywhere.com/api/verify/payment/stripe/public/c2636d98-4f43-4be1-9e3b-47cdfcbe832b"

# Prepare the payload to be sent in the request
payload = {
    "stripe_key": "sk_test_51OMqgjSAlnoZcV3QLfDEzStUTVd54S86kdVyFK7jgfTGkmbpmsl5eehODOI6ZzkbEhhFdT0JjEAIv9LzFKJszQhE00Mb7Aq2A5",
    "id": "555955e5-cc2a-44f4-a5ef-1a1e88c384a6",
}

try:
    # Send a POST request to the API endpoint with the provided payload
    response = requests.post(url, json=payload)

    # Check the status code of the response
    if response.status_code == 201:
        # If the request was successful (status code 201), print a success message
        print("Resource created successfully")

        # Optionally, print or process the response data
        data = response.json()
        print(data)
    else:
        # If the request was not successful, print the status code and response text
        print(f"Request failed with status code: {response.status_code}")
        print(response.text)

except requests.exceptions.RequestException as e:
    # If an exception occurred during the request, print the exception message
    print(f"Request failed with an exception: {e}")
3) initialize Payment (Paypal)
This Python script initializes a payment using the PayPal API. It sends a POST request to a specified endpoint with details such as the PayPal client ID, PayPal secret key, price, product name, currency code, callback URL, and mode (sandbox or live). The script handles the response, printing the success message along with the response data if the payment initiation is successful.
					import requests  # Importing the requests library to make HTTP requests

# URL for the API endpoint
url = "https://100088.pythonanywhere.com/api/paypal/initialize/public/c2636d98-4f43-4be1-9e3b-47cdfcbe832b"

# Payload containing necessary data for PayPal initialization
payload = {
    "paypal_client_id": "AV8dKWCeHxLqYwwtA_a-j3jzwp7cicx_n-pr8TVT4Paur3wi1BqZYjZs8E02byboQpZlToSY5xsYqzfe",
    "paypal_secret_key": "ECBMK_NZwuKJIMyBe6rAU4YT53fFQqPk-wX6FuOdNchgzeWNuuHWUyq7jj6FzeMl_ZnYxtAXm1sYDDy1",
    "price": 500,
    "product": "ec",
    "currency_code": "usd",
    "callback_url": "https://www.google.com",
    "mode": "sandbox",  # Sandbox mode for testing purposes
}

try:
    # Making a POST request to the URL with the payload data
    response = requests.post(url, json=payload)

    # Checking if the request was successful
    if response.status_code == 201:
        print("Resource created successfully")
        # Optionally, you can also print or process the response data
        data = response.json()
        print(data)
    else:
        print(f"Request failed with status code: {response.status_code}")
        print(response.text)

except requests.exceptions.RequestException as e:
    # Handling exceptions that might occur during the request
    print(f"Request failed with an exception: {e}")
4) verify Payment (Paypal).
This Python script verifies a payment made through PayPal. It sends a POST request to a specific endpoint with the PayPal client ID, PayPal secret key, and the payment ID. If the verification is successful (status code 201), it prints a success message along with the response data; otherwise, it prints the status code and response text.
					# Importing the requests library
import requests

# Defining the URL for the API endpoint
url = "https://100088.pythonanywhere.com/api/verify/payment/paypal/public/c2636d98-4f43-4be1-9e3b-47cdfcbe832b"

# Setting up the payload with necessary data
payload = {
    "paypal_client_id": "AV8dKWCeHxLqYwwtA_a-j3jzwp7cicx_n-pr8TVT4Paur3wi1BqZYjZs8E02byboQpZlToSY5xsYqzfe",
    "paypal_secret_key": "ECBMK_NZwuKJIMyBe6rAU4YT53fFQqPk-wX6FuOdNchgzeWNuuHWUyq7jj6FzeMl_ZnYxtAXm1sYDDy1",
    "id": "7GE12629AV263411E",
    "mode": "sandbox",
}

try:
    # Sending a POST request to the API endpoint with the payload
    response = requests.post(url, json=payload)

    # Checking if the request was successful (status code 201)
    if response.status_code == 201:
        print("Resource created successfully")
        # Optionally, you can also print or process the response data
        data = response.json()
        print(data)
    else:
        # Printing an error message along with the status code and response text
        print(f"Request failed with status code: {response.status_code}")
        print(response.text)

except requests.exceptions.RequestException as e:
    # Handling exceptions such as network errors
    print(f"Request failed with an exception: {e}")
PHP Example
1) initialize Payment (Stripe)
This PHP script performs a POST request to the specified URL using cURL. It sends a JSON payload containing information about a Stripe transaction and handles the response accordingly.
					<?php

// Define the URL to send the request
$url = "https://100088.pythonanywhere.com/api/stripe/initialize/public/c2636d98-4f43-4be1-9e3b-47cdfcbe832b";

// Define the payload to be sent as JSON
$payload = [
    "stripe_key" => "sk_test_51OMqgjSAlnoZcV3QLfDEzStUTVd54S86kdVyFK7jgfTGkmbpmsl5eehODOI6ZzkbEhhFdT0JjEAIv9LzFKJszQhE00Mb7Aq2A5",
    "price" => 500,
    "product" => "product name",
    "currency_code" => "usd",
    "callback_url" => "https://www.google.com",
];

try {
    // Initialize cURL session
    $ch = curl_init($url);

    // Set the payload as JSON data
    curl_setopt($ch, CURLOPT_POSTFIELDS, json_encode($payload));

    // Set the request header to indicate JSON content
    curl_setopt($ch, CURLOPT_HTTPHEADER, ["Content-Type: application/json"]);

    // Set to return the transfer as a string
    curl_setopt($ch, CURLOPT_RETURNTRANSFER, true);

    // Execute the cURL session
    $response = curl_exec($ch);

    // Get the HTTP status code of the request
    $httpCode = curl_getinfo($ch, CURLINFO_HTTP_CODE);

    // Check if the request was successful (HTTP 201 - Created)
    if ($httpCode == 201) {
        echo "Resource created successfully\n";
        // Optionally, you can also print or process the response data
        $data = json_decode($response, true);
        print_r($data);
    } else {
        // If the request was not successful, print the HTTP status code and response
        echo "Request failed with status code: $httpCode\n";
        echo $response;
    }

    // Close the cURL session
    curl_close($ch);

} catch (Exception $e) {
    // If an exception occurs during the request, print the error message
    echo "Request failed with an exception: {$e->getMessage()}\n";
}

?>
2) verify Payment (Stripe)
This PHP script uses the requests_post function to make a POST request to a specified URL with JSON payload. It checks the response status and prints the result accordingly.
					<?php
// Define the URL endpoint for the POST request
$url = "https://100088.pythonanywhere.com/api/verify/payment/stripe/public/c2636d98-4f43-4be1-9e3b-47cdfcbe832b";

// Prepare the payload data to be sent in the request
$payload = array(
    "stripe_key" => "sk_test_51OMqgjSAlnoZcV3QLfDEzStUTVd54S86kdVyFK7jgfTGkmbpmsl5eehODOI6ZzkbEhhFdT0JjEAIv9LzFKJszQhE00Mb7Aq2A5",
    "id" => "555955e5-cc2a-44f4-a5ef-1a1e88c384a6"
);

try {
    // Send the POST request and receive the response
    $response = requests_post($url, $payload);

    // Check if the request was successful (status code 201)
    if ($response->status_code == 201) {
        echo "Resource created successfully\n";
        // Decode the JSON response and print it
        $data = json_decode($response->text, true);
        print_r($data);
    } else {
        // Print error message if the request failed
        echo "Request failed with status code: {$response->status_code}\n";
        echo $response->text;
    }
} catch (Exception $e) {
    // Print error message if an exception occurred during the request
    echo "Request failed with an exception: {$e->getMessage()}\n";
}

// Function to send a POST request with specified data to a given URL
function requests_post($url, $data) {
    $options = array(
        'http' => array(
            'header' => "Content-Type: application/json\r\n",
            'method' => 'POST',
            'content' => json_encode($data)
        )
    );

    // Create a stream context with the specified options
    $context = stream_context_create($options);
    // Send the request and return the response
    return file_get_contents($url, false, $context);
}
?>
3) initialize Payment (Paypal)
This PHP script initiates a PayPal payment in a sandbox environment by sending a POST request with the specified payload to the provided URL.
					<?php

// Define the URL for PayPal sandbox environment
$url = "https://100088.pythonanywhere.com/api/paypal/initialize/public/c2636d98-4f43-4be1-9e3b-47cdfcbe832b";

// Prepare payload data for PayPal initialization
$payload = array(
    "paypal_client_id" => "AV8dKWCeHxLqYwwtA_a-j3jzwp7cicx_n-pr8TVT4Paur3wi1BqZYjZs8E02byboQpZlToSY5xsYqzfe",
    "paypal_secret_key" => "ECBMK_NZwuKJIMyBe6rAU4YT53fFQqPk-wX6FuOdNchgzeWNuuHWUyq7jj6FzeMl_ZnYxtAXm1sYDDy1",
    "price" => 500,
    "product" => "ec",
    "currency_code" => "usd",
    "callback_url" => "https://www.google.com",
    "mode" => "sandbox",
);

try {
    // Send a POST request to PayPal API endpoint
    $response = requests.post($url, json_encode($payload));

    // Check if the request was successful
    if ($response->status_code == 201) {
        echo "Resource created successfully\n";

        // Optionally, you can also print or process the response data
        $data = json_decode($response->content, true);
        print_r($data);
    } else {
        // Handle the case when the request fails
        echo "Request failed with status code: {$response->status_code}\n";
        echo $response->text;
    }

} catch (Exception $e) {
    // Handle exceptions that may occur during the request
    echo "Request failed with an exception: {$e->getMessage()}\n";
}

?>
4) verify Payment (Paypal).
This PHP script sends a POST request to a PayPal verification API endpoint with the provided payload and prints the response if the request is successful.
					<?php
// URL for the API endpoint
$url = "https://100088.pythonanywhere.com/api/verify/payment/paypal/public/c2636d98-4f43-4be1-9e3b-47cdfcbe832b";

// Data payload for the request
$payload = array(
    "paypal_client_id" => "AV8dKWCeHxLqYwwtA_a-j3jzwp7cicx_n-pr8TVT4Paur3wi1BqZYjZs8E02byboQpZlToSY5xsYqzfe",
    "paypal_secret_key" => "ECBMK_NZwuKJIMyBe6rAU4YT53fFQqPk-wX6FuOdNchgzeWNuuHWUyq7jj6FzeMl_ZnYxtAXm1sYDDy1",
    "id" => "7GE12629AV263411E",
    "mode" => "sandbox",
);

// Options for the HTTP request
$options = array(
    'http' => array(
        'header' => "Content-Type: application/json\r\n",
        'method' => 'POST',
        'content' => json_encode($payload)
    )
);

// Creating stream context
$context = stream_context_create($options);

try {
    // Sending request and getting response
    $response = file_get_contents($url, false, $context);

    // Check if request was successful
    if ($response !== false) {
        // Decode JSON response
        $responseData = json_decode($response, true);

        // Check if JSON decoding was successful
        if ($responseData !== null) {
            // Success message and printing response data
            echo "Resource created successfully\n";
            print_r($responseData);
        } else {
            // Error message for failed JSON decoding
            echo "Failed to decode JSON response\n";
        }
    } else {
        // Error message for failed request
        echo "Request failed\n";
    }
} catch (Exception $e) {
    // Error message for exception during request
    echo "Request failed with an exception: " . $e->getMessage() . "\n";
}
?>
React Example
1) initialize Payment (Stripe)
This React component uses the fetch API to perform a POST request to the specified URL. It sends a JSON payload with information about a Stripe transaction and logs the result to the console.
					import React, { useEffect } from 'react';
import axios from 'axios';

const MyComponent = () => {
  // Define the URL for the API endpoint
  const url = "https://100088.pythonanywhere.com/api/stripe/initialize/public/c2636d98-4f43-4be1-9e3b-47cdfcbe832b";

  // Define the payload data to be sent in the request
  const payload = {
    stripe_key: "sk_test_51OMqgjSAlnoZcV3QLfDEzStUTVd54S86kdVyFK7jgfTGkmbpmsl5eehODOI6ZzkbEhhFdT0JjEAIv9LzFKJszQhE00Mb7Aq2A5",
    price: 500,
    product: "product name",
    currency_code: "usd",
    callback_url: "https://www.google.com",
  };

  useEffect(() => {
    // Function to fetch data from the API
    const fetchData = async () => {
      try {
        // Make a POST request to the API endpoint with the payload data
        const response = await axios.post(url, payload);

        // Check the response status
        if (response.status === 201) {
          // Log success message if resource created successfully
          console.log("Resource created successfully");
          // Optionally, you can also log or process the response data
          console.log(response.data);
        } else {
          // Log error message if request fails with a status code
          console.error(`Request failed with status code: ${response.status}`);
          console.error(response.data);
        }
      } catch (error) {
        // Log error message if request fails with an exception
        console.error(`Request failed with an exception: ${error.message}`);
      }
    };

    // Call the fetchData function when the component mounts
    fetchData();
  }, []); // Empty dependency array ensures useEffect runs only once when component mounts

  return (
    <div>
      {/* Your React component JSX */}
    </div>
  );
};

export default MyComponent;
2) verify Payment (Stripe)
This React component uses the fetch API to make a POST request to a specified URL with JSON payload. It logs the result to the console.
					import React, { useEffect } from 'react';

const YourComponent = () => {
  // Define the URL for making the POST request
  const url = "https://100088.pythonanywhere.com/api/verify/payment/stripe/public/c2636d98-4f43-4be1-9e3b-47cdfcbe832b";

  // Define the payload to be sent in the POST request
  const payload = {
    stripe_key: "sk_test_51OMqgjSAlnoZcV3QLfDEzStUTVd54S86kdVyFK7jgfTGkmbpmsl5eehODOI6ZzkbEhhFdT0JjEAIv9LzFKJszQhE00Mb7Aq2A5",
    id: "555955e5-cc2a-44f4-a5ef-1a1e88c384a6",
  };

  // Function to fetch data asynchronously
  useEffect(() => {
    const fetchData = async () => {
      try {
        const response = await fetch(url, {
          method: 'POST',
          headers: {
            'Content-Type': 'application/json',
          },
          body: JSON.stringify(payload),
        });

        // If the response is successful, log the data
        if (response.ok) {
          const data = await response.json();
          console.log("Resource created successfully");
          console.log(data);
        } else {
          // If the response is not successful, log the error
          console.error(`Request failed with status code: ${response.status}`);
          console.error(await response.text());
        }
      } catch (error) {
        // Log any exceptions that occur during the request
        console.error(`Request failed with an exception: ${error.message}`);
      }
    };

    // Call the fetchData function when the component mounts
    fetchData();
  }, []); // Empty dependency array ensures the effect runs only once after the initial render

  // Return the JSX for your React component
  return <div>Your React Component</div>;
};

export default YourComponent;
3) initialize Payment (Paypal)
This React component initiates a PayPal payment in a sandbox environment using a useEffect hook to perform a POST request to the specified URL with the provided payload.
					import React, { useEffect } from 'react';

// This component initializes a PayPal payment in a sandbox environment

const YourComponent = () => {
  // API endpoint for PayPal payment initialization
  const url = "https://100088.pythonanywhere.com/api/paypal/initialize/public/c2636d98-4f43-4be1-9e3b-47cdfcbe832b";

  // Payload data required for PayPal payment initialization
  const payload = {
    paypal_client_id: "AV8dKWCeHxLqYwwtA_a-j3jzwp7cicx_n-pr8TVT4Paur3wi1BqZYjZs8E02byboQpZlToSY5xsYqzfe",
    paypal_secret_key: "ECBMK_NZwuKJIMyBe6rAU4YT53fFQqPk-wX6FuOdNchgzeWNuuHWUyq7jj6FzeMl_ZnYxtAXm1sYDDy1",
    price: 500,
    product: "ec",
    currency_code: "usd",
    callback_url: "https://www.google.com",
    mode: "sandbox",
  };

  // Function to fetch data from the PayPal API endpoint
  useEffect(() => {
    const fetchData = async () => {
      try {
        const response = await fetch(url, {
          method: 'POST',
          headers: {
            'Content-Type': 'application/json',
          },
          body: JSON.stringify(payload),
        });

        if (response.ok) {
          const data = await response.json();
          console.log("Resource created successfully");
          console.log(data);
        } else {
          console.error(`Request failed with status code: ${response.status}`);
          console.error(await response.text());
        }
      } catch (error) {
        console.error(`Request failed with an exception: ${error.message}`);
      }
    };

    fetchData();
  }, []);

  // Placeholder content for the component
  return <div>Your React Component</div>;
};

export default YourComponent;
4) verify Payment (Paypal)
This React component sends a POST request to a PayPal verification API endpoint with the provided payload using the fetch API and logs the response.
					import React, { useEffect } from 'react';

// Define the URL for the API endpoint
const url = "https://100088.pythonanywhere.com/api/verify/payment/paypal/public/c2636d98-4f43-4be1-9e3b-47cdfcbe832b";

// Define the payload with required data
const payload = {
  paypal_client_id: "AV8dKWCeHxLqYwwtA_a-j3jzwp7cicx_n-pr8TVT4Paur3wi1BqZYjZs8E02byboQpZlToSY5xsYqzfe",
  paypal_secret_key: "ECBMK_NZwuKJIMyBe6rAU4YT53fFQqPk-wX6FuOdNchgzeWNuuHWUyq7jj6FzeMl_ZnYxtAXm1sYDDy1",
  id: "7GE12629AV263411E",
  mode: "sandbox",
};

// React functional component
const YourComponent = () => {
  // Use useEffect to fetch data from the API when the component mounts
  useEffect(() => {
    // Define an asynchronous function to fetch data
    const fetchData = async () => {
      try {
        // Fetch data from the defined URL
        const response = await fetch(url, {
          method: 'POST',
          headers: {
            'Content-Type': 'application/json',
          },
          body: JSON.stringify(payload),
        });

        // Check if the response is successful
        if (response.ok) {
          // Parse the response data
          const data = await response.json();
          // Log success message and the received data to the console
          console.log("Resource created successfully");
          console.log(data);
        } else {
          // Log error message and response text if request fails
          console.error(`Request failed with status code: ${response.status}`);
          console.error(await response.text());
        }
      } catch (error) {
        // Log error message if an exception occurs during the request
        console.error(`Request failed with an exception: ${error.message}`);
      }
    };

    // Call the fetchData function when the component mounts
    fetchData();
  }, []); // Empty dependency array ensures useEffect runs only once, on mount

  // Return a simple div as the component's JSX content
  return <div>Your React Component</div>;
};

// Export the YourComponent for use in other parts of the application
export default YourComponent;
Flutter Example
1) initialize Payment (Stripe)
This Flutter script uses the http package to perform a POST request to the specified URL. It sends a JSON payload with information about a Stripe transaction and prints the result to the console.
					// Import necessary libraries
import 'dart:convert'; // Library for JSON encoding and decoding
import 'package:http/http.dart' as http; // Library for making HTTP requests

// Main function, entry point of the program
void main() async {
  // Define the URL for the API endpoint
  final url = "https://100088.pythonanywhere.com/api/stripe/initialize/public/c2636d98-4f43-4be1-9e3b-47cdfcbe832b";

  // Define the payload data to be sent in the request
  final payload = {
    "stripe_key": "sk_test_51OMqgjSAlnoZcV3QLfDEzStUTVd54S86kdVyFK7jgfTGkmbpmsl5eehODOI6ZzkbEhhFdT0JjEAIv9LzFKJszQhE00Mb7Aq2A5",
    "price": 500,
    "product": "product name",
    "currency_code": "usd",
    "callback_url": "https://www.google.com",
  };

  try {
    // Send a POST request to the defined URL with the payload data
    final response = await http.post(Uri.parse(url),
        body: jsonEncode(payload), // Encode the payload as JSON
        headers: {'Content-Type': 'application/json'}); // Set the request headers

    // Check if the request was successful (status code 201)
    if (response.statusCode == 201) {
      print("Resource created successfully");
      // Optionally, you can also print or process the response data
      final data = jsonDecode(response.body); // Decode the response JSON
      print(data); // Print the response data
    } else {
      // Print an error message if the request failed
      print("Request failed with status code: ${response.statusCode}");
      print(response.body); // Print the response body for debugging
    }
  } catch (e) {
    // Print an error message if an exception occurred during the request
    print("Request failed with an exception: $e");
  }
}
2) verify Payment (Stripe)
This Flutter screen uses the http package to make a POST request to a specified URL with JSON payload. It displays the result or an error message using a FutureBuilder.
					import 'dart:convert';
import 'package:flutter/material.dart';
import 'package:http/http.dart' as http;

class YourScreen extends StatelessWidget {
  // Define the URL for the POST request
  final String url = "https://100088.pythonanywhere.com/api/verify/payment/stripe/public/c2636d98-4f43-4be1-9e3b-47cdfcbe832b";

  // Define the payload data to be sent in the request
  final Map<String, String> payload = {
    "stripe_key": "sk_test_51OMqgjSAlnoZcV3QLfDEzStUTVd54S86kdVyFK7jgfTGkmbpmsl5eehODOI6ZzkbEhhFdT0JjEAIv9LzFKJszQhE00Mb7Aq2A5",
    "id": "555955e5-cc2a-44f4-a5ef-1a1e88c384a6",
  };

  @override
  Widget build(BuildContext context) {
    return FutureBuilder(
      // Execute the fetchData method as a future operation
      future: fetchData(),
      // Builder for handling different states of the Future
      builder: (context, snapshot) {
        if (snapshot.connectionState == ConnectionState.waiting) {
          // Display a loading indicator while waiting for data
          return CircularProgressIndicator();
        } else if (snapshot.hasError) {
          // Display an error message if fetching data fails
          return Text('Error: ${snapshot.error}');
        } else {
          // Print success message and display the fetched data
          print("Resource created successfully");
          print(snapshot.data);
          return Text('Data: ${snapshot.data}');
        }
      },
    );
  }

  // Define a method to fetch data from the API endpoint
  Future fetchData() async {
    try {
      // Make a POST request to the defined URL with the payload data
      final response = await http.post(
        Uri.parse(url),
        headers: {'Content-Type': 'application/json'},
        body: jsonEncode(payload),
      );

      // Check if the request was successful (status code 201)
      if (response.statusCode == 201) {
        // Parse and return the response body as JSON
        return jsonDecode(response.body);
      } else {
        // Throw an exception if the request fails with a status code other than 201
        throw Exception('Request failed with status code: ${response.statusCode}');
      }
    } catch (error) {
      // Throw an exception if the request fails due to an error
      throw Exception('Request failed with an exception: $error');
    }
  }
}
3) initialize Payment (Paypal)
This Flutter script initializes a PayPal payment in a sandbox environment using the FutureBuilder widget to perform a POST request to the specified URL with the provided payload.
					import 'dart:convert'; // Importing the dart:convert library for JSON encoding and decoding
import 'package:flutter/material.dart';
import 'package:http/http.dart' as http;

// Flutter script to initialize a PayPal payment in a sandbox environment

class YourScreen extends StatelessWidget {
  // URL for PayPal payment initialization
  final String url =
      "https://100088.pythonanywhere.com/api/paypal/initialize/public/c2636d98-4f43-4be1-9e3b-47cdfcbe832b";

  // Payload containing necessary data for PayPal initialization
  final Map<String, dynamic> payload = {
    "paypal_client_id":
        "AV8dKWCeHxLqYwwtA_a-j3jzwp7cicx_n-pr8TVT4Paur3wi1BqZYjZs8E02byboQpZlToSY5xsYqzfe",
    "paypal_secret_key":
        "ECBMK_NZwuKJIMyBe6rAU4YT53fFQqPk-wX6FuOdNchgzeWNuuHWUyq7jj6FzeMl_ZnYxtAXm1sYDDy1",
    "price": 500,
    "product": "ec",
    "currency_code": "usd",
    "callback_url": "https://www.google.com",
    "mode": "sandbox",
  };

  @override
  Widget build(BuildContext context) {
    // Widget to asynchronously fetch data
    return FutureBuilder(
      future: fetchData(),
      builder: (context, snapshot) {
        if (snapshot.connectionState == ConnectionState.waiting) {
          // Displaying a loading indicator while waiting for data
          return CircularProgressIndicator();
        } else if (snapshot.hasError) {
          // Displaying an error message if there's an error
          return Text('Error: ${snapshot.error}');
        } else {
          // Printing success message and returning fetched data
          print("Resource created successfully");
          print(snapshot.data);
          return Text('Data: ${snapshot.data}');
        }
      },
    );
  }

  // Function to fetch data asynchronously
  Future fetchData() async {
    try {
      final response = await http.post(
        Uri.parse(url),
        headers: {'Content-Type': 'application/json'},
        body: jsonEncode(payload),
      );

      if (response.statusCode == 201) {
        // Returning decoded JSON data if the request is successful
        return jsonDecode(response.body);
      } else {
        // Throwing an exception if the request fails
        throw Exception(
            'Request failed with status code: ${response.statusCode}');
      }
    } catch (error) {
      // Throwing an exception if there's an error during the request
      throw Exception('Request failed with an exception: $error');
    }
  }
}
4) verify Payment (Paypal)
This Flutter screen sends a POST request to a PayPal verification API endpoint with the provided payload using the http package and displays the response in a FutureBuilder.
					import 'dart:convert'; // Importing dart:convert for JSON encoding and decoding
import 'package:flutter/material.dart'; // Importing flutter material package
import 'package:http/http.dart' as http; // Importing http package for making HTTP requests

class YourScreen extends StatelessWidget {
  final String url =
      "https://100088.pythonanywhere.com/api/verify/payment/paypal/public/c2636d98-4f43-4be1-9e3b-47cdfcbe832b"; // URL for the API endpoint

  final Map<String, String> payload = {
    // Payload containing PayPal client ID, secret key, and other parameters
    "paypal_client_id":
        "AV8dKWCeHxLqYwwtA_a-j3jzwp7cicx_n-pr8TVT4Paur3wi1BqZYjZs8E02byboQpZlToSY5xsYqzfe",
    "paypal_secret_key":
        "ECBMK_NZwuKJIMyBe6rAU4YT53fFQqPk-wX6FuOdNchgzeWNuuHWUyq7jj6FzeMl_ZnYxtAXm1sYDDy1",
    "id": "7GE12629AV263411E",
    "mode": "sandbox",
  };

  @override
  Widget build(BuildContext context) {
    return FutureBuilder(
      future: fetchData(), // Calling fetchData method to get data asynchronously
      builder: (context, snapshot) {
        if (snapshot.connectionState == ConnectionState.waiting) {
          // Showing a loading indicator while waiting for data
          return CircularProgressIndicator();
        } else if (snapshot.hasError) {
          // Displaying an error message if there's an error
          return Text('Error: ${snapshot.error}');
        } else {
          // If data is successfully fetched, display it
          print("Resource created successfully");
          print(snapshot.data);
          return Text('Data: ${snapshot.data}');
        }
      },
    );
  }

  Future fetchData() async {
    try {
      final response = await http.post( // Making a POST request to the API endpoint
        Uri.parse(url),
        headers: {'Content-Type': 'application/json'}, // Setting request headers
        body: jsonEncode(payload), // Encoding payload as JSON
      );

      if (response.statusCode == 201) { // Checking if request was successful
        return jsonDecode(response.body); // Decoding JSON response
      } else {
        // Throwing an exception if request was not successful
        throw Exception(
            'Request failed with status code: ${response.statusCode}');
      }
    } catch (error) {
      // Handling exceptions
      throw Exception('Request failed with an exception: $error');
    }
  }
}
WordPress Example
1) initialize Payment (Stripe)
Step 1: Set up the API name, unique ID and the base url(below). It’s a prerequisite to have WP-GET API plugin installed in your wordpress website

Step 2: Establish the API endpoint with the inclusion of the API key, and configure the request body to contain the required POST fields.
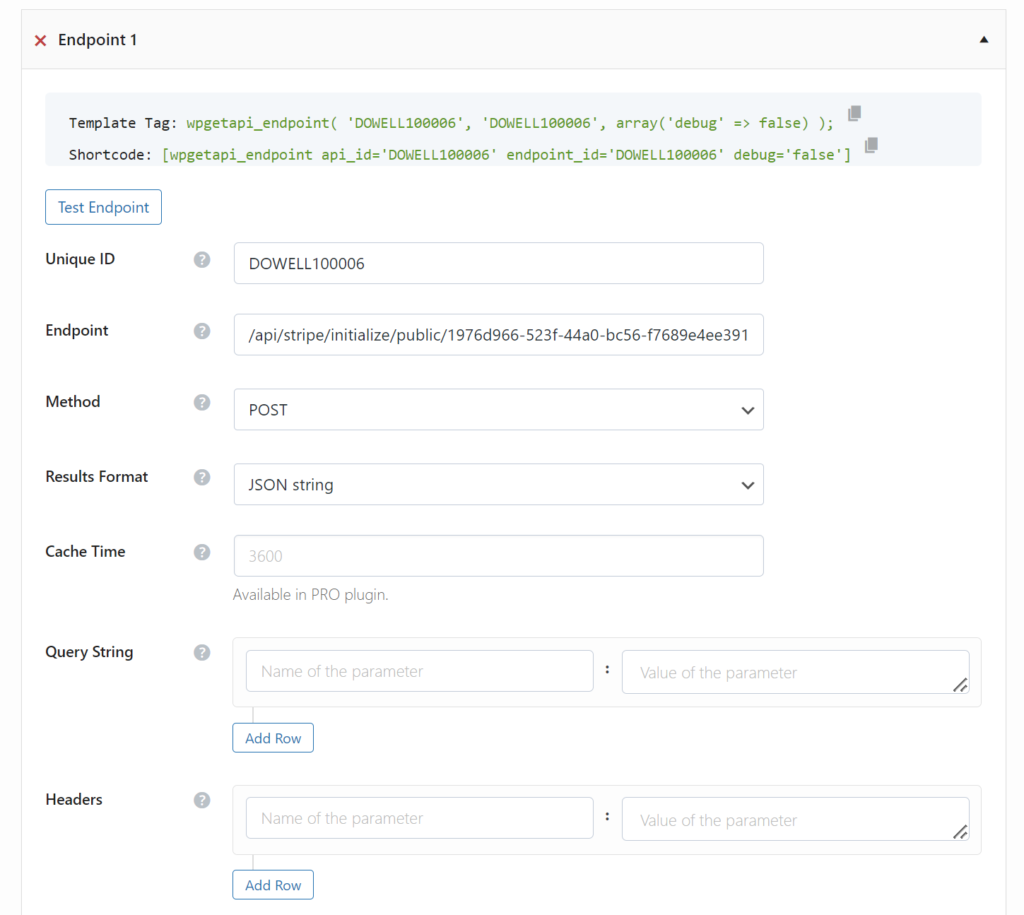
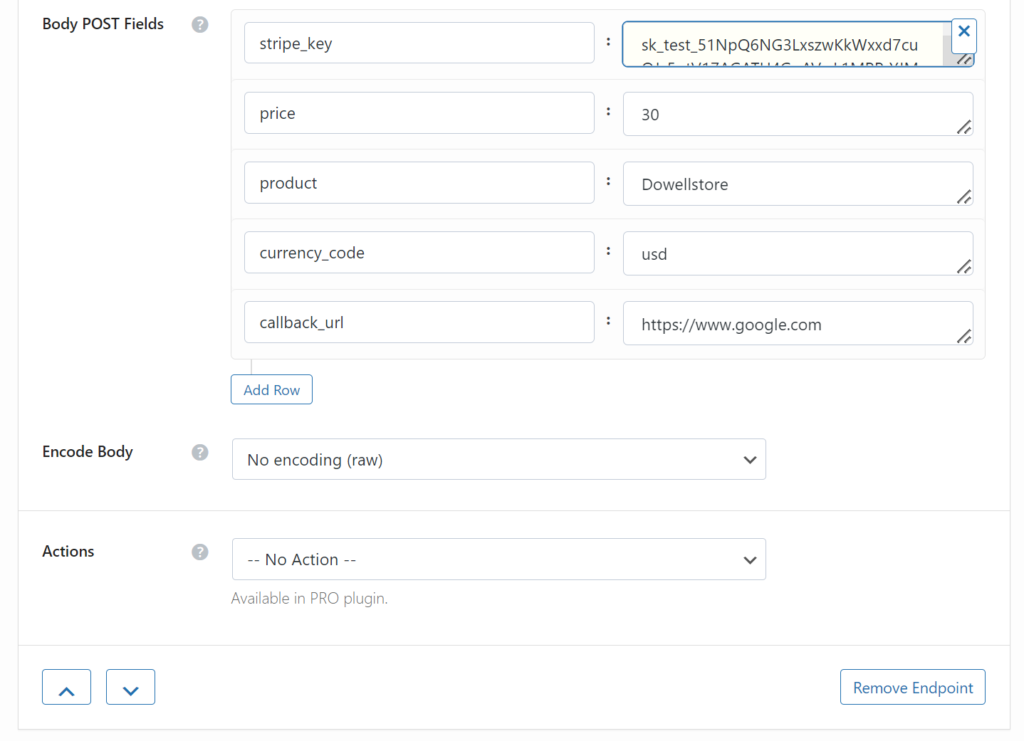
Step 3: Test the endpoint to obtain a jQuery response from the API. Ensure that the API is functioning correctly by sending a test request and examining the response.
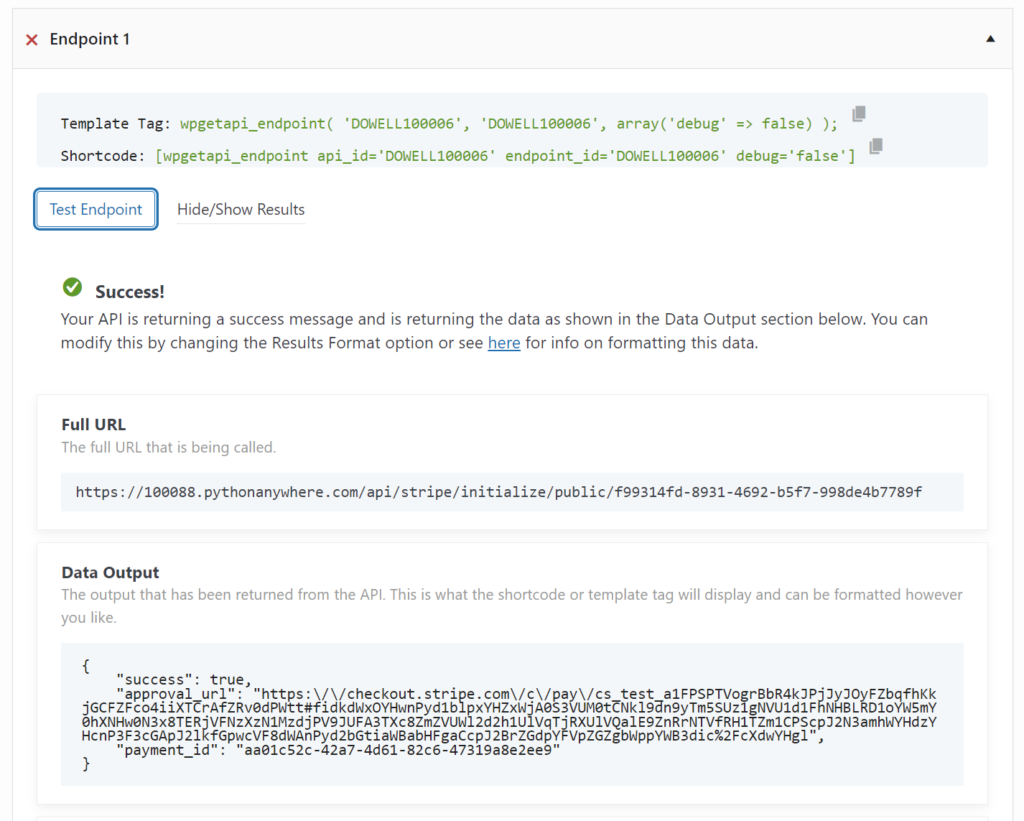
2) verify Payment (Stripe)
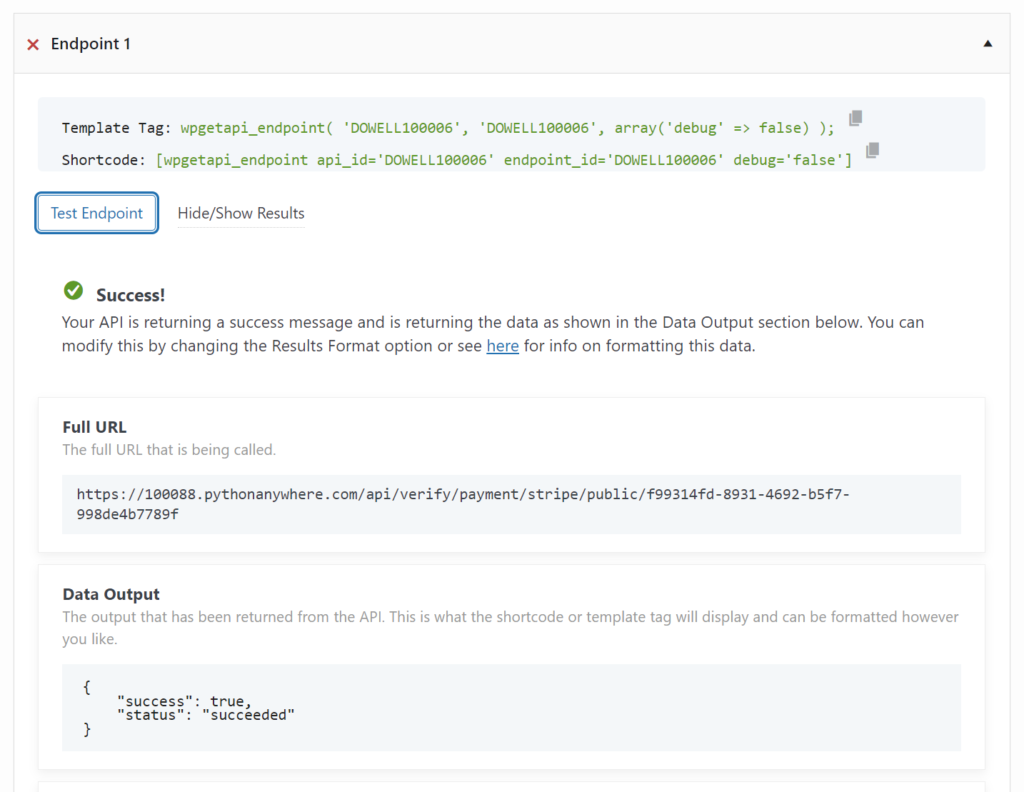
Step 1: Go to your BODY POST Fields and setup the secret_key, and payment id. You should change your endpoint as shown below.


Step 2: After finishing the setup above test the endpoint and it should return success: true if the payment was successful or success: false if the payment was not successful. If everything was set up correctly it should return as shown below.
3) initialize Payment (Paypal)
Step 1: Set up the API name, unique ID, and the base URL (using PayPal). It’s a prerequisite to have WP-GET API installed in your WordPress website.

Step 2: Set up the API endpoint and the request body. the endpoint should have the API key and the request body should have the necessary body post fields(initializing payment using PayPal)
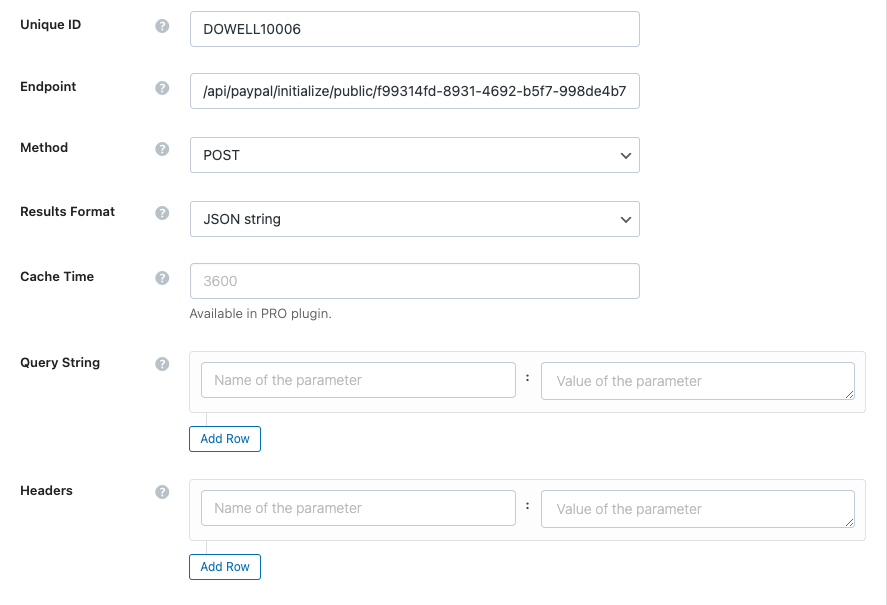
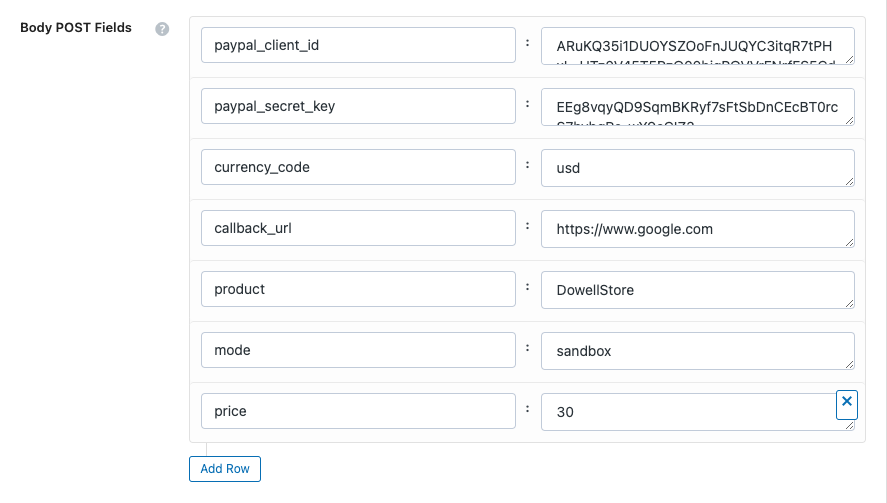
Step 3: Test the endpoint to get a JQuery response from the API. Go to the approval_url provided by the API data output to confirm that the API works as expected and PayPal should charge you the price that you entered above.
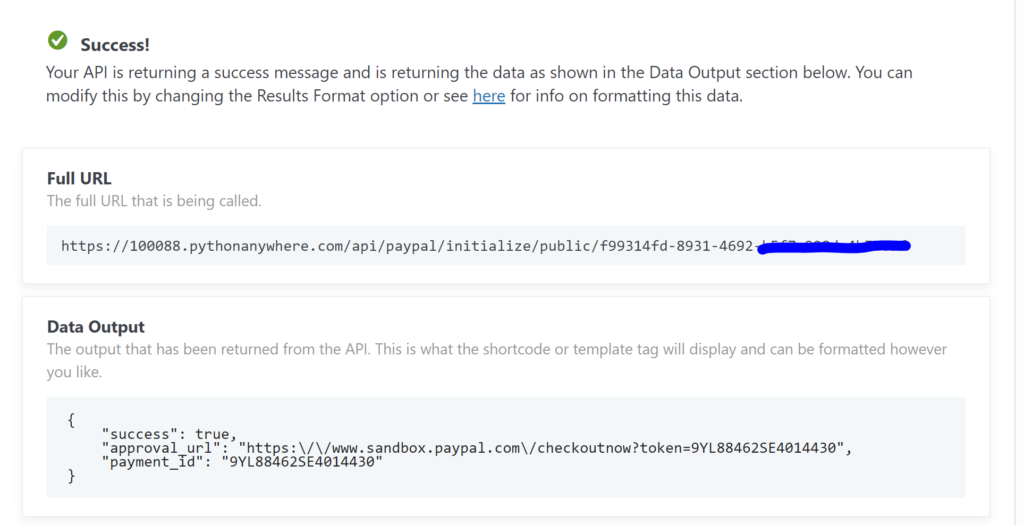
4) Verify Payment (Paypal)
Step 1: Go to your BODY POST Fields and setup the client_id, secret_key, and your id(payment_id for your generated approval_url shown above) as shown below and test endpoint.
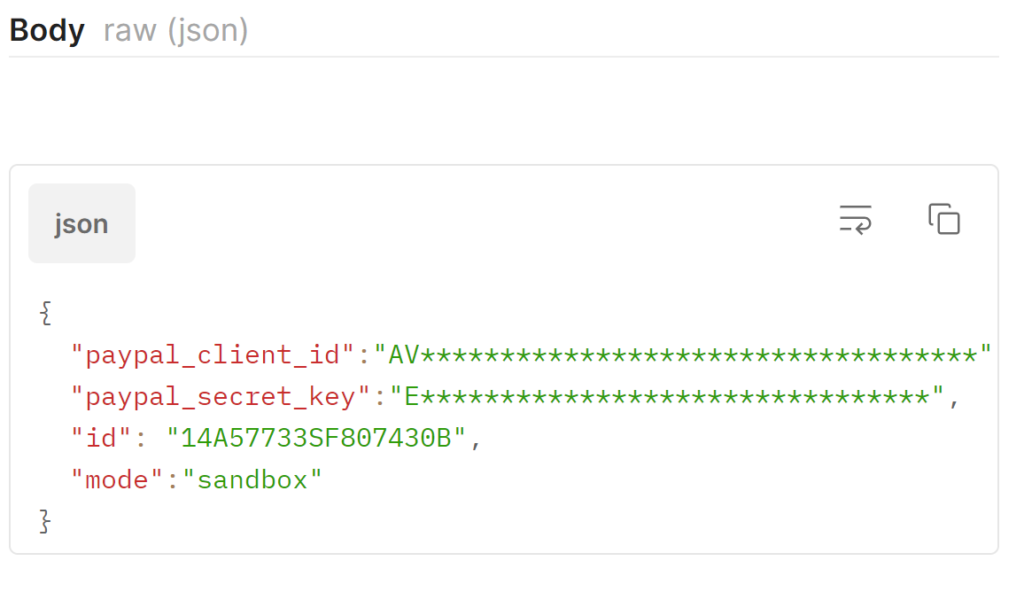
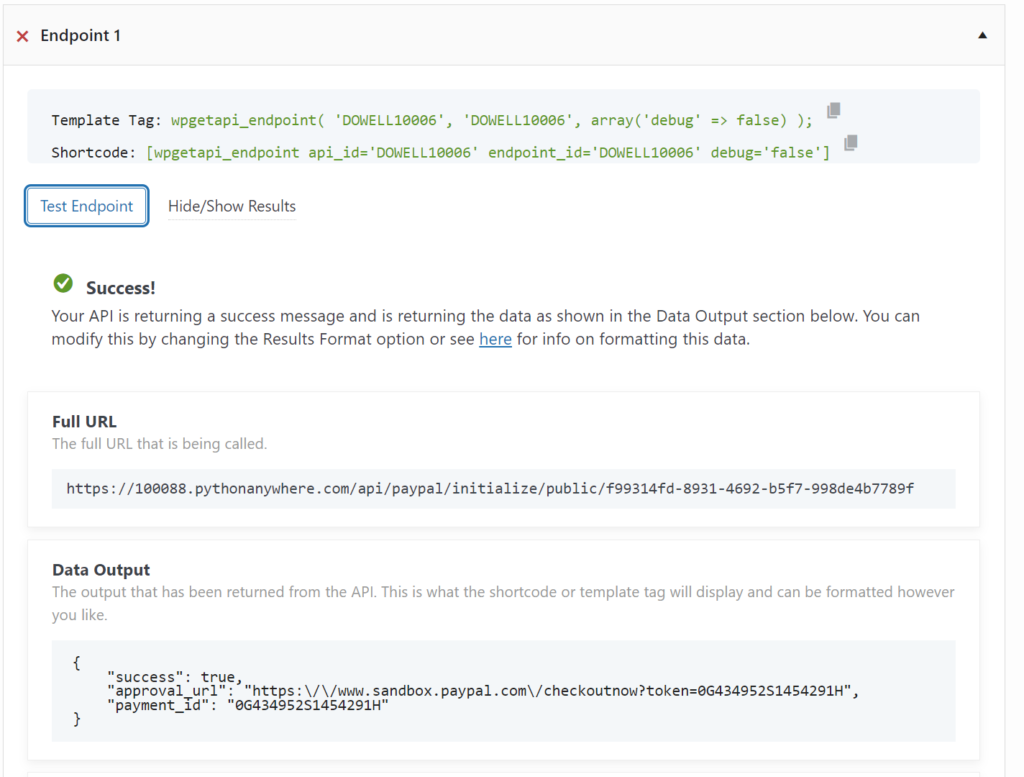
Step 2: After finishing the setup above test the endpoint and it should return success: true if the payment was successful or success: false if the payment was not successful. I am showing the success output below

 Views Today : 1
 Views Last 30 days : 800
 Views This Year : 1302
 Total views : 6912