Dowell Random Graph API
Connect the dots of possibility with Dowell Random Graph API

Dowell
Random Graph API
Welcome to the Random Graph API!. Dowell Random Graph API provides two functionalities: Field Random Points and Excel Random Points. This API allows you to generate random points within a Cartesian plane and create random points based on an Excel-like grid. These features offer flexibility in generating random graphs for various applications.
Key Features

Two Functions
That are Field Random Points and Excel Random Points.

Random Point Generation
The API generates random points within a Cartesian plane based on the provided parameters. It ensures that the generated points fall within the specified boundaries of the plane.

Starting Position Selection
You can choose the starting position within the Cartesian plane from where the random point generation begins. This allows you to control the location and orientation of the generated points.

Radius or Number of Points Selection
The API allows you to choose whether you want to specify the radius or the number of points to generate. This flexibility accommodates different requirements and use cases.

Customizable Cartesian Plane
You can define the dimensions of the Cartesian plane by specifying the side length. The plane will be centered at the origin (0, 0) and extend to ±side/2 on each axis.
Getting Started
Getting Started with the Random Graph API’s Key Features:
Field Random Points
- This request is a POST method
http://100022.pythonanywhere.com/v2/fieldrp/<YOUR-API-KEY>/ - It sends a request body in JSON format with the following parameters:
{ "side": 100, "selection": 5, "choice": 0, "value": 10 } - The response body contains a JSON object with the following properties:
{
    "input_data": {
        "side": 100,
        "selection": 5,
        "choice": 0,
        "value": 10
    },
    "listOfPoints": [
        [
            0.0,
            -50.0
        ],
        [
            -25.52297676729542,
            -25.063737215226876
        ],
        [
            34.14062194962708,
            -39.62418785695287
        ],
        [
            21.67777066559354,
            -21.657208964092913
        ],
        [
            12.013646607068841,
            -16.400716675267816
        ],
        [
            -18.991085728674772,
            -19.791090592653163
        ],
        [
            34.491270056136585,
            -40.85714297115947
        ],
        [
            -23.49416380702403,
            -23.143644853705762
        ],
        [
            -12.503982474978494,
            -16.58009624489332
        ],
        [
            -34.12630387593561,
            -39.577191908968814
        ]
    ],
    "success": true
}
Excel Random Points
- This request is also a POST method
http://100022.pythonanywhere.com/v2/excelrp/<YOUR-API-KEY>/ - It sends a request body in JSON format with the following parameters:
{ "side":10, "selection":5 } - The response body contains a JSON object with the following properties:
{
    "input_data": {
        "side": 10,
        "selection": 5
    },
    "listOfPoints": [
        [
            5.0,
            8.0
        ],
        [
            8.0,
            5.0
        ],
        [
            4.0,
            2.0
        ],
        [
            9.0,
            3.0
        ],
        [
            10.0,
            7.0
        ],
        [
            3.0,
            7.0
        ],
        [
            7.0,
            8.0
        ],
        [
            2.0,
            9.0
        ],
        [
            6.0,
            6.0
        ],
        [
            1.0,
            10.0
        ]
    ],
    "success": true
}

Postman Documentation
For detailed API documentation, including endpoint descriptions, request and response examples, and authentication details, please refer to the API documentation
Dowell Random Graph API Demonstrative Scenarios
In the following scenarios, Dowell will furnish comprehensive instructions on obtaining the Service key and guide you through the steps to use the API. You’ll find examples in various formats such as Python, PHP, React, Flutter, and WordPress in the tabs below. Feel free to explore the examples in each tab for practical insights.
Dowell Random Graph API Use Cases
Discover the magic of Random Graph API! Imagine exploring wild habitats, testing super cool games, or creating simulated data adventures. Dive into our video to unlock the secrets of geospatial analysis, data simulation, and game development. Ready for an adventure? Watch now!
Frequently Asked Questions (FAQs) about Dowell Random Graph API
1. What are the key features of the API?
The API offers two main functionalities: Field Random Points and Excel Random Points. It allows for generating random points within a Cartesian plane with customizable parameters.
2. Can I control the starting position for random point generation?
Yes, you can specify the starting position within the Cartesian plane, providing control over the location and orientation of the generated points.
3. What parameters can I customize when generating random points in a field?
You can specify parameters such as the side length of the Cartesian plane, the number of points to generate, and whether to use a radius or exact number of points.
4. How do I generate random points in a field using the API?
You can make a POST request to the fieldrp endpoint with appropriate JSON parameters, including side length, selection, choice, and value.
5. Can I generate random points based on an Excel-like grid?
Yes, the API also supports generating random points based on an Excel-like grid. You can make a POST request to the excelrp endpoint with the desired parameters.
6. What kind of support is available if I encounter any issues while using the API?
If you encounter any issues, have questions, or need assistance with Dowell Random Graph API, you can contact the support team for prompt assistance. Contact us at Dowell@dowellresearch.uk
7. Is there any authentication required to use the API?
Yes, you need to provide your Service key in the request URL to access the API endpoints.
8. Is there any rate limiting enforced on API requests?
The documentation doesn’t specify any rate limiting, but it’s advisable to check with the API provider or monitor your usage to avoid any potential restrictions.
9. Are there any SDKs or libraries available for easier integration?
The documentation doesn’t mention any specific SDKs or libraries, but you can integrate the API directly into your application using standard HTTP requests.
10. What other APIs does Dowell UX Living Lab provide besides Random Graph API?
Dowell UX Living Lab offers a wide range of APIs to enhance user experience and streamline various processes. To explore the full list of APIs available, including Dowell Email, Dowell Newsletter, Samanta Content Evaluator, and many more.
For more details and to explore the complete list of APIs provided by Dowell UX Living Lab, please visit our documentation page.
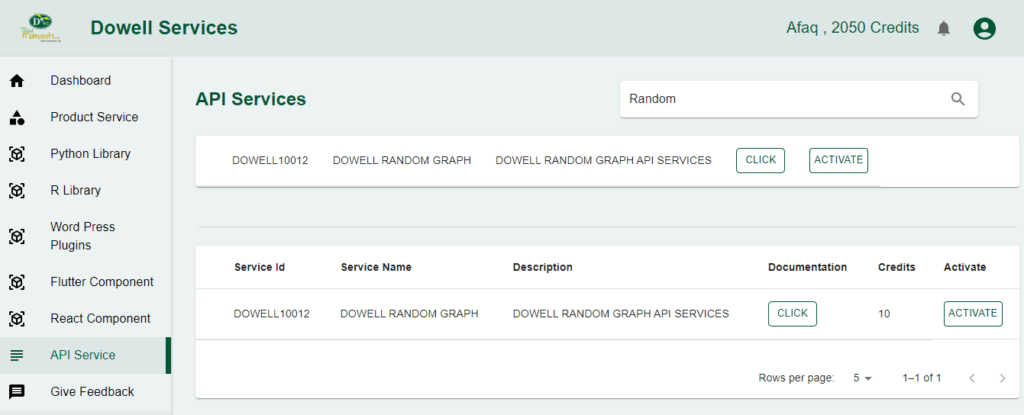
How To Get The API Key
- Access the Dowellstore website through this link: https://dowellstore.org and login. Once on the website, navigate to the API service section and activate the DOWELL RANDOM GRAPH API service. The API Key you need can be found in the dashboard, provided there as the service key. For more information follow the instructions in the videos found at the link below.
[How to get API key and redeem your voucher Step-by-Step Tutorial] - You can also find a step-by-step guide on how to get the API key and activate the API(s) by following this link Get The Service Key
- Then set the API KEY as part of the url parameter as shown below. Replace with your actual API key. The URL format: https://www.socialmediaautomation.uxlivinglab.online/api/v1/generate-sentences/
- Note: Make sure to activate your API from Dowell API Key System link provided above.
Python Example
1. Field Random Point
The first script sends a POST request to the “Sentence Generation” API, providing specific parameters such as target industry, product, and verb. If successful (status code 200), it prints the generated sentences; otherwise, it notifies of the request failure.
					import requests

url = "https://www.socialmediaautomation.uxlivinglab.online/api/v1/generate-sentences/"

payload = {
    "target_industry": "Technology & Telecom",
    "target_product": "Social Media Automation",
    "object": "gift",
    "verb": "present",
    "adjective": "small",
    "subject": "Livinglab",
    "object_determinant": "the",
    "object_number": "singular",
    "subject_number": "singular",
    "email": "test@gmail.com",
    "api_key": "c2636d98-4f43-4be1-9e3b-47cdfcbe832b",
}

response = requests.post(url, json=payload)

if response.status_code == 200:
    data = response.json()
    print(data)
else:
    print(f"Request failed with status code: {response.status_code}")
2. Excel Random Point
- The second script utilizes a POST request to an API endpoint for Excel resource creation. It specifies parameters like “side” and “selection.” If the resource is created successfully (status code 201), it prints a success message along with optional processing of the response data; otherwise, it handles and prints details of the request failure or exception.
					import requests

url = (
    "http://100022.pythonanywhere.com/v2/excelrp/c2636d98-4f43-4be1-9e3b-47cdfcbe832b/"
)

payload = {"side": 10, "selection": 5}

try:
    response = requests.post(url, json=payload)

    if response.status_code == 201:
        print("Resource created successfully")
        # Optionally, you can also print or process the response data
        data = response.json()
        print(data)
    else:
        print(f"Request failed with status code: {response.status_code}")
        print(response.text)

except requests.exceptions.RequestException as e:
    print(f"Request failed with an exception: {e}")
PHP Example
1. Field Random Point
This PHP script uses the file_get_contents function to send a POST request to the specified URL with JSON payload. It then checks the response status and decodes the JSON response if successful.
					<?php

$url = "http://100022.pythonanywhere.com/v2/excelrp/c2636d98-4f43-4be1-9e3b-47cdfcbe832b/";
$payload = ["side" => 100, "selection" => 5, "choice" => 0, "value" => 10];

$options = [
    "http" => [
        "method"  => "POST",
"header"  => "Content-type: application/json",
        "content" => json_encode($payload),
    ],
];

try {
    $context = stream_context_create($options);
    $response = file_get_contents($url, false, $context);

    if ($response !== false) {
        $decodedResponse = json_decode($response, true);

        if (json_last_error() === JSON_ERROR_NONE) {
            echo "Resource created successfully\n";
            print_r($decodedResponse);
        } else {
            echo "Failed to decode JSON response\n";
        }
    } else {
        echo "Request failed\n";
    }
} catch (Exception $e) {
    echo "Request failed with an exception: {$e->getMessage()}\n";
}

?>
2) Excel Random Point
This PHP script uses the cURL library to perform an HTTP POST request to the specified URL with the given payload. It checks the HTTP status code of the response and handles success or failure accordingly.
					<?php

$url = "http://100022.pythonanywhere.com/v2/excelrp/c2636d98-4f43-4be1-9e3b-47cdfcbe832b/";

$payload = ["side" => 10, "selection" => 5];

try {
    $ch = curl_init();
    curl_setopt($ch, CURLOPT_URL, $url);
    curl_setopt($ch, CURLOPT_POST, 1);
    curl_setopt($ch, CURLOPT_POSTFIELDS, json_encode($payload));
    curl_setopt($ch, CURLOPT_RETURNTRANSFER, true);

    $response = curl_exec($ch);
    $httpCode = curl_getinfo($ch, CURLINFO_HTTP_CODE);

    curl_close($ch);

    if ($httpCode == 201) {
        echo "Resource created successfully\n";
        // Optionally, you can also print or process the response data
        $data = json_decode($response, true);
        print_r($data);
    } else {
        echo "Request failed with status code: $httpCode\n";
        echo $response;
    }

} catch (Exception $e) {
    echo "Request failed with an exception: " . $e->getMessage() . "\n";
}

?>
React Example
1. Field Random Point
This React component uses the fetch API to send a POST request to the specified URL with JSON payload. It then handles the response and logs the appropriate messages.
					import React, { useEffect } from 'react';

const YourComponent = () => {
  const url = "http://100022.pythonanywhere.com/v2/excelrp/c2636d98-4f43-4be1-9e3b-47cdfcbe832b/";
  const payload = { side: 100, selection: 5, choice: 0, value: 10 };

  useEffect(() => {
    const fetchData = async () => {
      try {
        const response = await fetch(url, {
          method: 'POST',
          headers: {
            'Content-Type': 'application/json',
          },
          body: JSON.stringify(payload),
        });

        if (response.status === 201) {
          console.log('Resource created successfully');
          const data = await response.json();
          console.log(data);
        } else {
          console.log(`Request failed with status code: ${response.status}`);
          console.log(await response.text());
        }
      } catch (error) {
        console.log(`Request failed with an exception: ${error.message}`);
      }
    };

    fetchData();
  }, []);

  return <div>Your React component content here</div>;
};

export default YourComponent;
2) Excel Random Point
This React component uses the axios library to perform an asynchronous HTTP POST request to the specified URL with the given payload. It logs the success or failure of the request to the console.
					import React, { useEffect } from 'react';
import axios from 'axios';

const MyComponent = () => {
  const url = "http://100022.pythonanywhere.com/v2/excelrp/c2636d98-4f43-4be1-9e3b-47cdfcbe832b/";
  const payload = { side: 10, selection: 5 };

  useEffect(() => {
    const fetchData = async () => {
      try {
        const response = await axios.post(url, payload);

        if (response.status === 201) {
          console.log("Resource created successfully");
          // Optionally, you can also log or process the response data
          const data = response.data;
          console.log(data);
        } else {
          console.log(`Request failed with status code: ${response.status}`);
          console.log(response.data);
        }

      } catch (error) {
        console.log(`Request failed with an exception: ${error.message}`);
      }
    };

    fetchData();
  }, []);

  return (
    // Your React component JSX code goes here
    <div>
      {/* Component content */}
    </div>
  );
};

export default MyComponent;
Flutter Example
1) Field Random Point
This Flutter app uses the http package to send a POST request to the specified URL with JSON payload. It then handles the response asynchronously and displays appropriate messages using a FutureBuilder.
					import 'dart:convert';
import 'package:flutter/material.dart';
import 'package:http/http.dart' as http;

void main() => runApp(MyApp());

class MyApp extends StatelessWidget {
  @override
  Widget build(BuildContext context) {
    return MaterialApp(
      home: MyHomePage(),
    );
  }
}

class MyHomePage extends StatelessWidget {
  final String url =
      "http://100022.pythonanywhere.com/v2/excelrp/c2636d98-4f43-4be1-9e3b-47cdfcbe832b/";
  final Map<String, dynamic> payload = {
    "side": 100,
    "selection": 5,
    "choice": 0,
    "value": 10,
  };

  @override
  Widget build(BuildContext context) {
    return Scaffold(
      appBar: AppBar(
        title: Text('Flutter HTTP Request'),
      ),
      body: Center(
        child: FutureBuilder(
          future: fetchData(),
          builder: (context, snapshot) {
            if (snapshot.connectionState == ConnectionState.waiting) {
              return CircularProgressIndicator();
            } else if (snapshot.hasError) {
              return Text('Request failed with an exception: ${snapshot.error}');
            } else {
              return Column(
                mainAxisAlignment: MainAxisAlignment.center,
                children: [
                  Text('Resource created successfully'),
                  Text('Response data: ${snapshot.data}'),
                ],
              );
            }
          },
        ),
      ),
    );
  }

  Future fetchData() async {
    try {
      final response = await http.post(
        Uri.parse(url),
        headers: {
          'Content-Type': 'application/json',
        },
        body: jsonEncode(payload),
      );

      if (response.statusCode == 201) {
        return jsonDecode(response.body);
      } else {
        throw Exception(
            'Request failed with status code: ${response.statusCode}\n${response.body}');
      }
    } catch (error) {
      throw Exception('Request failed with an exception: $error');
    }
  }
}
2) Excel Random Point
This Flutter code uses the http package to perform a POST request asynchronously. The initState method ensures that the fetchData function is called when the widget is initialized. Adjust the code within the if (response.statusCode == 200) block to handle the response data as needed for your application.
					import 'dart:convert';
import 'package:flutter/material.dart';
import 'package:http/http.dart' as http;

class MyWidget extends StatelessWidget {
  final String url =
      "http://100022.pythonanywhere.com/v2/excelrp/c2636d98-4f43-4be1-9e3b-47cdfcbe832b/";
  final Map<String, dynamic> payload = {"side": 10, "selection": 5};

  @override
  Widget build(BuildContext context) {
    Future<void> fetchData() async {
      try {
        final response = await http.post(
          Uri.parse(url),
          headers: <String, String>{
            'Content-Type': 'application/json; charset=UTF-8',
          },
body: jsonEncode(payload),
        );

        if (response.statusCode == 201) {
          print("Resource created successfully");
          // Optionally, you can also print or process the response data
          final data = json.decode(response.body);
          print(data);
        } else {
          print("Request failed with status code: ${response.statusCode}");
          print(response.body);
        }

      } catch (error) {
        print("Request failed with an exception: $error");
      }
    }

    fetchData();

    return Container(
      // Your Flutter widget code goes here
      child: Text('Hello World!'),
    );
  }
}
WordPress Example
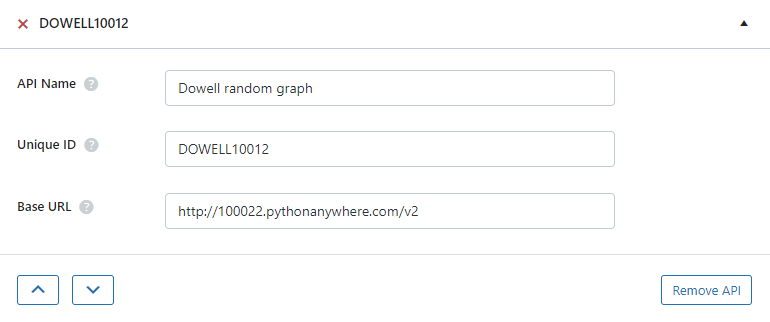
Set up the API name, unique ID and the base url(below). It’s a prerequisite to have WP-GET API plugin installed in your wordpress website
1) Field Random Point
Step 1: Establish the API endpoint Field Random Point with the inclusion of the API key, and configure the request body to contain the required POST fields.
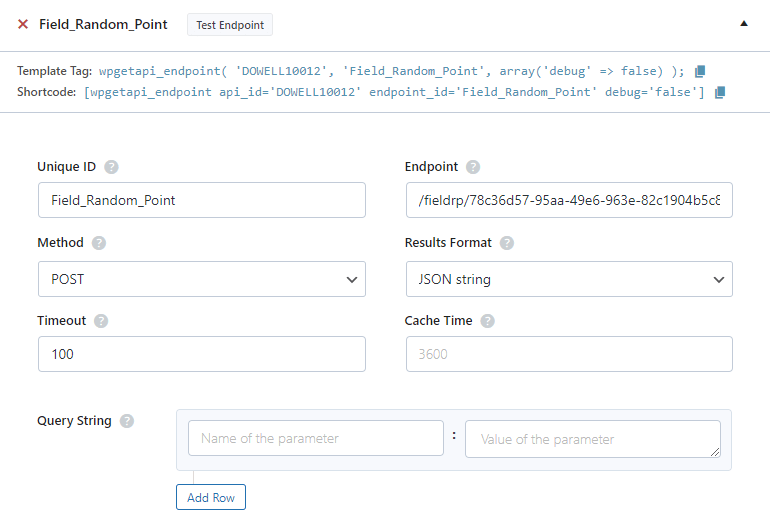
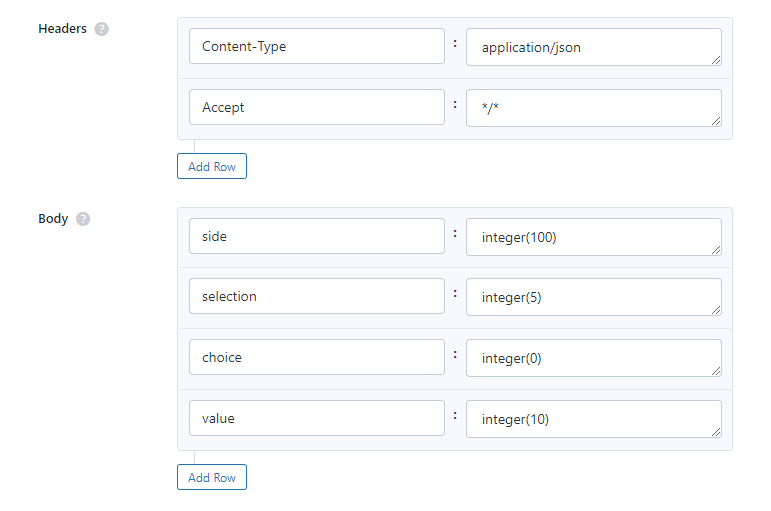
Step 2: Test the endpoint Field Random Point to obtain a jQuery response from the API. Ensure that the API is functioning correctly by sending a test request and examining the response.
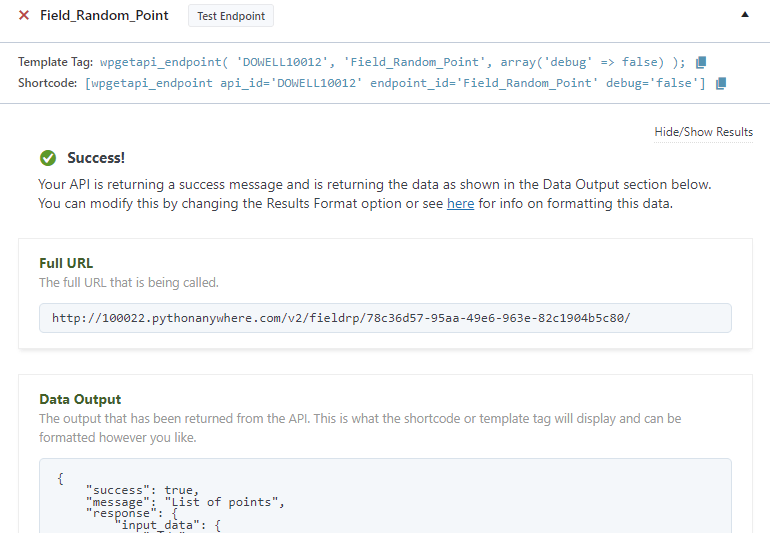
Step 3: To display the output fetched from the API service, copy the shortcode provided by the plugin and add it onto your wordpress website page.

2) Excel Random Point
Step 1: Establish the API endpoint Excel Random Point with the inclusion of the API key, and configure the request body to contain the required POST fields.
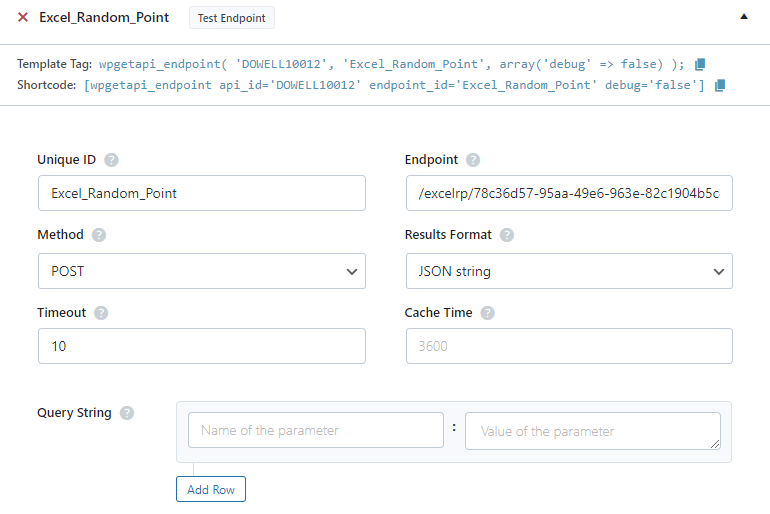
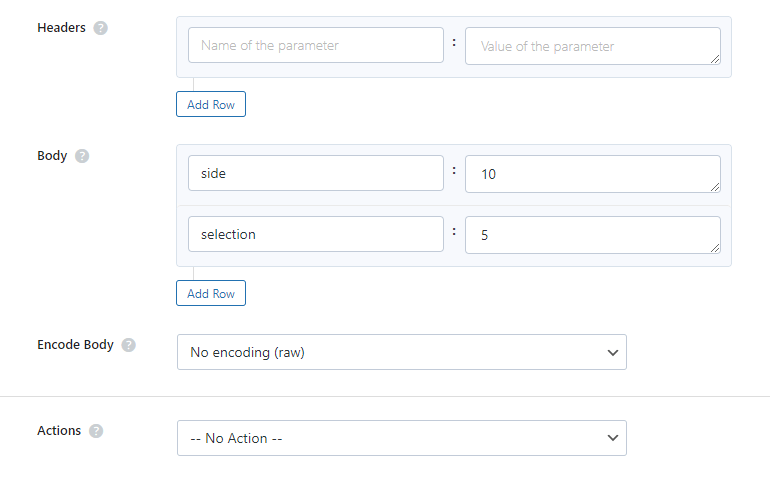
Step 2: Test the endpoint Excel Random Point to obtain a jQuery response from the API. Ensure that the API is functioning correctly by sending a test request and examining the response.

Step 3: To display the output fetched from the API service, copy the shortcode provided by the plugin and add it onto your wordpress website page.


 Views Today : 1
 Views Last 30 days : 787
 Views This Year : 1302
 Total views : 6912