Dowell Secure Github Repository API
Trust the shield for your Github stronghold: Dowell Secure Repository API

Dowell Secure
Github Repository API
Welcome to the Dowell Secure Github Repository API !. This API seamlessly integrates with Github’s webhooks, enabling automatic backups of code repositories. It provides real-time backups triggered by specified events, ensuring data protection. The API offers customization options, allowing developers to define backup frequency and scope. With robust encryption and disaster recovery mechanisms, the Secure Repository API ensures the integrity and availability of your code backups.
Key Features

Repository Clone
The API enables easy cloning of repositories, allowing you to create copies of your codebase. This functionality ensures that you have a complete and up-to-date backup of your repositories, ready for immediate use or restoration.

Webhooks Integration
With seamless integration with Github's webhooks, the API automatically triggers backups based on specified events. Whether it's a new commit, branch update, or pull request, the API captures these changes in real-time, ensuring that your backups are always up to date.

Backup Reports
The Secure Repository API generates comprehensive backup reports, providing valuable insights into the status and success of each backup operation. These reports include details such as backup timestamps, repository names, and any potential errors encountered during the backup process. These reports serve as a handy reference for tracking backup history and troubleshooting.

Repository Reports
In addition to backup reports, the API also generates repository reports, offering an overview of each repository's status and health. These reports provide information such as the number of commits, branches, and contributors, giving you a clear snapshot of your codebase's activity and progress.
Getting Started
Getting Started with the Secure Repository API’s Key Features:
Review the API Postman Documentation mention below to understand the available endpoints, request parameters, and response formats.
To clone a repository using the Secure Repository API, make a POST request to the following endpoint: POST
/repository-clone. Include the following payload data in the request body:{ "repository_url": "<repository_url>", "api_key": "<api_key>", "services": "DoWell Secure Repository" }Replace the repository_url value with the URL of the repository you want to clone. Ensure you provide a valid api_key to authenticate your request. The services field indicates the service you want to utilize i.e “DoWell Secure Repository”.
To set up a webhook for the Secure Repository API, follow the standard webhook creation process provided by Github. Configure the webhook’s payload URL to point to url recieved from the repository-clone endpoint within your application to handle the backup events triggered by the webhook.
To retrieve backup reports using the Secure Repository API, send a GET request to the following endpoint: GET
/backup-reports/<api_key>/. Replace <api_key> with the actual API key associated with your backups. This request will fetch the backup reports containing valuable information such as timestamps, repository names, and any encountered errors during the backup process.To obtain repository reports through the Secure Repository API, issue a GET request to the following endpoint: GET
/repository-reports/<api_key>/. Replace <api_key> with the appropriate API key linked to your repositories. This request will provide you with an overview of each repository’s status, including details like commit count, branch information, and contributors.

Postman Documentation
For detailed API documentation, including endpoint descriptions, request and response examples, and authentication details, please refer to the API documentation
Dowell Secure Github Repository API Demonstrative Scenarios
In the following scenarios, Dowell will furnish comprehensive instructions on obtaining the Service key and guide you through the steps to use the API. You’ll find examples in various formats such as Python, PHP, React, Flutter, and WordPress in the tabs below. Feel free to explore the examples in each tab for practical insights.
Dowell Secure Github Repository API Use Cases
Dive into the world of Dowell Secure Github Repository API! Discover how it ensures code safety and collaboration. Explore audit trails for accountability, real-time backups for teamwork confidence, and insightful monitoring for optimized development. Watch our video for an engaging walkthrough of these essential use cases!
Frequently Asked Questions (FAQs) about Dowell Secure Github Repository API
1. How do I clone a repository using the API?
You can clone a repository by making a POST request to the /repository-clone endpoint with the repository URL and API key.
2. What events trigger automatic backups through webhooks?
Events such as new commits, branch updates, or pull requests trigger automatic backups.
3. Can I customize the backup frequency?
Yes, you can define the backup frequency and scope according to your requirements.
4. What information do backup reports provide?
Backup reports include details such as timestamps, repository names, and any encountered errors during the backup process.
5. What insights do repository reports offer?
Repository reports provide information on commit count, branch details, contributors, etc.
6. What kind of support is available if I encounter any issues while using the API?
If you encounter any issues, have questions, or need assistance with Dowell Secure Github Repository API, you can contact the support team for prompt assistance. Contact us at Dowell@dowellresearch.uk
7. Can I integrate this API with third-party tools?
Yes, you can integrate the API with third-party tools using the provided endpoints and documentation.
8. Are there any costs associated with using the API?
The API documentation doesn’t mention any costs, but you should confirm with the provider.
9. What authentication method does the API use?
The API uses API keys for authentication.
10. What other APIs does Dowell UX Living Lab provide besides Secure Github Repository API?
Dowell UX Living Lab offers a wide range of APIs to enhance user experience and streamline various processes. To explore the full list of APIs available, including Dowell Email, Dowell Newsletter, Samanta Content Evaluator, and many more.
For more details and to explore the complete list of APIs provided by Dowell UX Living Lab, please visit our documentation page.
How To Get The API Key
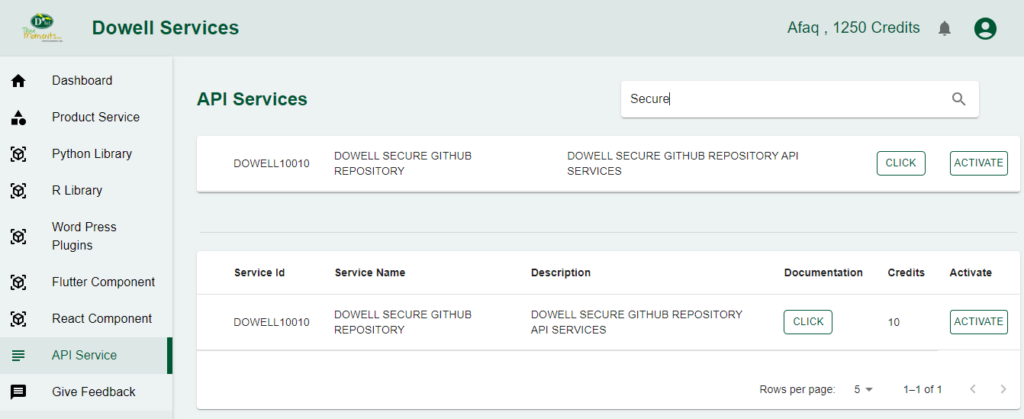
- Access the Dowellstore website through this link: https://dowellstore.org and login. Once on the website, navigate to the API service section and activate the DOWELL SECURE GITHUB REPOSITORY API service. The API Key you need can be found in the dashboard, provided there as the service key. For more information follow the instructions in the videos found at the link below.
[How to get API key and redeem your voucher Step-by-Step Tutorial] - You can also find a step-by-step guide on how to get the API key and activate the API(s) by following this link Get The Service Key
- Then set the API KEY as part of the url parameter as shown below. Replace with your actual API key. The URL format: https://www.socialmediaautomation.uxlivinglab.online/api/v1/generate-sentences/
- Note: Make sure to activate your API from Dowell API Key System link provided above.
Python Example
1. Repository Clone
This Python script utilizes the `requests` library to make a POST request to a specified URL, cloning a repository. It includes a JSON payload containing the repository URL and an API key for authentication. If the request is successful (status code 201), it prints a success message and optionally processes the response data, providing a concise way to interact with a repository backup API.
					import requests

url = "http://100045.pythonanywhere.com/repository-backup/v3/repositoryClone/"

payload = {
    "repository_url": "https://github.com/RitikChahar/Test-Repository.git",
    "api_key": "c2636d98-4f43-4be1-9e3b-47cdfcbe832b",
}

response = requests.post(url, json=payload)

if response.status_code == 201:
    print("Resource created successfully")
    # Optionally, you can also print or process the response data
    data = response.json()
    print(data)
2. Repository Reports
The provided Python script sends a GET request to a specified URL, expecting a resource creation response (status code 201). It prints the retrieved data on success or displays an error message with the status code and response text on failure. The code is designed to interact with a repository reporting API endpoint.
					import requests

url = "https://100045.pythonanywhere.com/reports/respository-reports/6142777c-d3f9-4274-93a4-0ab0ac64f690/"


response = requests.get(url)

if response.status_code == 201:
    print("Resource created successfully")
    # Optionally, you can also print or process the response data
    data = response.json()
    print(data)
else:
    print(f"Request failed with status code: {response.status_code}")

print(f"Request failed with status code: {response.status_code}")
print(response.text)
3. Backup Reports
This Python script uses the `requests` library to send a GET request to a specified URL. It checks the HTTP status code in the response, printing the retrieved data if the status code is 201 (indicating success) or an error message otherwise. The script demonstrates a basic HTTP request for fetching data from a web API.
					import requests

url = "https://100045.pythonanywhere.com/reports/backup-reports/6142777c-d3f9-4274-93a4-0ab0ac64f690/"

response = requests.get(url)

if response.status_code == 201:
    print("Resource created successfully")
    # Optionally, you can also print or process the response data
    data = response.json()
    print(data)
else:
    print(f"Request failed with status code: {response.status_code}")

print(f"Request failed with status code: {response.status_code}")
print(response.text)
PHP Example
1.Repository Clone
This PHP script performs a POST request to a specified URL, attempting to clone a repository. It includes a JSON payload with repository information and an API key. The script then checks the HTTP response header to determine if the request was successful (HTTP 201 Created) and prints relevant information or displays an error message with the response content. Ensure the provided API key and repository URL are accurate and adjust the script accordingly based on your requirements.
					<?php

$url = "http://100045.pythonanywhere.com/repository-backup/v3/repositoryClone/";

$payload = [
    "repository_url" => "https://github.com/RitikChahar/Test-Repository.git",
    "api_key" => "c2636d98-4f43-4be1-9e3b-47cdfcbe832b",
];

$options = [
    "http" => [
        "header" => "Content-type: application/json",
        "method" => "POST",
        "content" => json_encode($payload),
    ],
];

$context = stream_context_create($options);
$response = file_get_contents($url, false, $context);

if ($http_response_header[0] == "HTTP/1.1 201 Created") {
    echo "Resource created successfully\n";
    // Optionally, you can also print or process the response data
    $data = json_decode($response, true);
    print_r($data);
} else {
    echo "Request failed with status code: " . $http_response_header[0] . "\n";
    echo $response . "\n";
}
?>
2 Repository Reports
This PHP script performs a GET request to a specified URL and attempts to decode the JSON response. It checks for success in fetching the resource, and if successful, it prints or processes the decoded response data. Additionally, it handles potential errors during the request and JSON decoding, providing informative messages for troubleshooting.
					<?php
$url = "https://100045.pythonanywhere.com/reports/respository-reports/6142777c-d3f9-4274-93a4-0ab0ac64f690/";

$response = file_get_contents($url);

if ($response !== false) {
    $decodedResponse = json_decode($response, true);

    if (json_last_error() === JSON_ERROR_NONE) {
        echo "Resource fetched successfully\n";
        // Optionally, you can also print or process the response data
        print_r($decodedResponse);
    } else {
        echo "Failed to decode JSON response\n";
        echo "JSON Error: " . json_last_error_msg() . "\n";
    }
} else {
    echo "Request failed\n";
    // Optionally, you can also print or process the error message
    echo "Error: " . error_get_last()['message'] . "\n";
}

?>
3. Backup Reports
This PHP code uses the cURL library to make a GET request to the specified URL. It checks the HTTP status code in the response and prints the result accordingly. Note that in PHP, CURLOPT_HTTPGET is set to true by default, so it’s not strictly necessary to include it unless you want to explicitly set it.
					<?php

$url = "https://100045.pythonanywhere.com/reports/backup-reports/6142777c-d3f9-4274-93a4-0ab0ac64f690/";

$curl = curl_init($url);

// Set the necessary cURL options
curl_setopt($curl, CURLOPT_RETURNTRANSFER, true);
curl_setopt($curl, CURLOPT_HTTPGET, true);

// Execute the cURL request
$response = curl_exec($curl);
$httpCode = curl_getinfo($curl, CURLINFO_HTTP_CODE);
// Close cURL session
curl_close($curl);

// Process the response
if ($httpCode == 200) {
    echo "Resource retrieved successfully\n";
    $data = json_decode($response, true);
    print_r($data);
} else {
    echo "Request failed with status code: $httpCode\n";
    echo "$response\n";
}
?>
React Example
1. Repository Clone
The request includes a JSON payload containing a repository URL and an API key. If the response status is 201, indicating success, it logs a confirmation message and the response data; otherwise, it logs an error message with the corresponding status code. This code encapsulates an asynchronous data-fetching operation within a React functional component.
					import React, { useEffect } from 'react';

const MyComponent = () => {
  const url = 'http://100045.pythonanywhere.com/repository-backup/v3/repositoryClone/';

  const payload = {
    repository_url: 'https://github.com/RitikChahar/Test-Repository.git',
    api_key: 'c2636d98-4f43-4be1-9e3b-47cdfcbe832b',
  };

  useEffect(() => {
    const fetchData = async () => {
      try {
        const response = await fetch(url, {
          method: 'POST',
          headers: {
            'Content-Type': 'application/json',
          },
          body: JSON.stringify(payload),
        });

        if (response.status === 201) {
          console.log('Resource created successfully');
          const data = await response.json();
          console.log(data);
        } else {
          console.log(`Request failed with status code: ${response.status}`);
        }
      } catch (error) {
        console.error(`An unexpected error occurred: ${error}`);
      }
    };

    fetchData();
  }, []); // Empty dependency array means this effect runs once on component mount

  return <div>Your React component content goes here</div>;
};

export default MyComponent;
2. Repository Reports
This React component utilizes the `useEffect` hook to make an asynchronous GET request to a specified URL. It logs the success and retrieved data to the console when the request is successful. In case of failure, it logs the error details, providing a simple yet effective mechanism for fetching and handling data from an API endpoint in a React application.
					import React, { useEffect, useState } from 'react';

const YourComponent = () => {
  const url = "https://100045.pythonanywhere.com/reports/respository-reports/6142777c-d3f9-4274-93a4-0ab0ac64f690/";

  useEffect(() => {
    const fetchData = async () => {
      try {
        const response = await fetch(url);
        if (response.ok) {
          console.log("Resource retrieved successfully");
          const data = await response.json();
          console.log(data);
        } else {
          console.error(`Request failed with status code: ${response.status}`);
          console.error(await response.text());
        }
      } catch (error) {
        console.error(`An unexpected error occurred: ${error}`);
      }
    };

    fetchData();
  }, []);

  return <div>Your React component</div>;
};

export default YourComponent;
3. Backup Reports
This React component utilizes the `useEffect` hook to fetch data from a specified URL (`url`). It dynamically updates the state based on the success or failure of the request, displaying the retrieved data when successful, and an error message otherwise. The component provides a responsive user interface, rendering either a success message with the data or a loading/error message based on the asynchronous request status.
					import React, { useEffect, useState } from 'react';

const YourComponent = () => {
  const url = "https://100045.pythonanywhere.com/reports/backup-reports/6142777c-d3f9-4274-93a4-0ab0ac64f690/";
  const [data, setData] = useState(null);
  const [error, setError] = useState(null);

  useEffect(() => {
    const fetchData = async () => {
      try {
        const response = await fetch(url);
        if (response.ok) {
          const result = await response.json();
          setData(result);
        } else {
          setError(`Request failed with status code: ${response.status}`);
        }
      } catch (error) {
        setError(`An error occurred: ${error.message}`);
      }
    };

    fetchData();
  }, [url]);

  return (
    <div>
      {data ? (
        <div>
          <p>Resource retrieved successfully</p>
          <pre>{JSON.stringify(data, null, 2)}</pre>
        </div>
      ) : (
        <p>{error || "Loading..."}</p>
      )}
    </div>
  );
};

export default YourComponent;
Flutter Example
1. Repository Clone
This Flutter widget, named `MyWidget`, performs a POST request to a specified URL with a JSON payload containing repository information and an API key. It handles the response, printing “Resource created successfully” and the data if the status code is 201, or an error message otherwise. The widget initializes the request in its `initState` method and provides a basic user interface with the message “Your Flutter widget content goes here.” Adjust the content as needed for your application.
					import 'dart:convert';
import 'package:flutter/material.dart';
import 'package:http/http.dart' as http;

class MyWidget extends StatefulWidget {
  @override
  _MyWidgetState createState() => _MyWidgetState();
}

class _MyWidgetState extends State<MyWidget> {
  final String url = 'http://100045.pythonanywhere.com/repository-backup/v3/repositoryClone/';

  final Map<String, dynamic> payload = {
    'repository_url': 'https://github.com/RitikChahar/Test-Repository.git',
    'api_key': 'c2636d98-4f43-4be1-9e3b-47cdfcbe832b',
  };

  @override
  void initState() {
    super.initState();
    fetchData();
  }

  Future<void> fetchData() async {
    try {
      final response = await http.post(
        Uri.parse(url),
        headers: {'Content-Type': 'application/json'},
        body: jsonEncode(payload),
      );

      if (response.statusCode == 201) {
        print('Resource created successfully');
        final data = jsonDecode(response.body);
        print(data);
      } else {
        print('Request failed with status code: ${response.statusCode}');
      }
    } catch (error) {
      print('An unexpected error occurred: $error');
    }
  }

  @override
  Widget build(BuildContext context) {
    return Scaffold(
      body: Center(
        child: Text('Your Flutter widget content goes here'),
      ),
    );
  }
}
2. Repository Reports
This Flutter code defines a widget named `YourWidget` that, upon initialization, makes a GET request to a specified URL. If the request is successful (status code 200), it prints a success message along with the retrieved data; otherwise, it prints an error message with the status code and response body. The widget, for illustration purposes, displays a simple text message in the center of the screen. Adjust the URL and UI elements based on your specific use case.
					import 'dart:convert';
import 'package:flutter/material.dart';
import 'package:http/http.dart' as http;

class YourWidget extends StatefulWidget {
  @override
  _YourWidgetState createState() => _YourWidgetState();
}

class _YourWidgetState extends State<YourWidget> {
  final String url = "https://100045.pythonanywhere.com/reports/respository-reports/6142777c-d3f9-4274-93a4-0ab0ac64f690/";

  @override
  void initState() {
    super.initState();
    fetchData();
  }

  void fetchData() async {
    try {
      final response = await http.get(Uri.parse(url));
      if (response.statusCode == 200) {
        print("Resource retrieved successfully");
        final data = json.decode(response.body);
        print(data);
      } else {
        print("Request failed with status code: ${response.statusCode}");
        print(response.body);
      }
    } catch (error) {
      print("An unexpected error occurred: $error");
    }
  }

  @override
  Widget build(BuildContext context) {
    return Scaffold(body: Center(child: Text("Your Flutter Widget")));
  }
}
3. Backup Reports
This Flutter code defines a widget that makes a GET request to a specified URL, displaying the retrieved data when successful or an error message if the request fails. It showcases asynchronous data fetching, state management, and dynamic UI updates in a Flutter app. Adjust the URL and error handling to suit your application’s needs.
					import 'dart:convert';
import 'package:flutter/material.dart';
import 'package:http/http.dart' as http;

class YourWidget extends StatefulWidget {
  @override
  _YourWidgetState createState() => _YourWidgetState();
}

class _YourWidgetState extends State<YourWidget> {
  final String url = "https://100045.pythonanywhere.com/reports/backup-reports/6142777c-d3f9-4274-93a4-0ab0ac64f690/";
  Map<String, dynamic> data;
  String error;

  @override
  void initState() {
    super.initState();
    fetchData();
  }

  Future<void> fetchData() async {
    try {
      final response = await http.get(Uri.parse(url));
      if (response.statusCode == 200) {
        setState(() {
          data = json.decode(response.body);
        });
      } else {
        setState(() {
          error = "Request failed with status code: ${response.statusCode}";
        });
      }
    } catch (error) {
      setState(() {
        error = "An error occurred: $error";
      });
    }
  }

  @override
  Widget build(BuildContext context) {
    return Scaffold(
      appBar: AppBar(
        title: Text("Your App"),
      ),
      body: Center(
        child: data != null
            ? Column(
                mainAxisAlignment: MainAxisAlignment.center,
                children: [
                  Text("Resource retrieved successfully"),
                  SizedBox(height: 10),
                  Text(json.encode(data, prettyPrint: true)),
                ],
              )
            : Text(error ?? "Loading..."),
      ),
    );
  }
}
WordPress Example
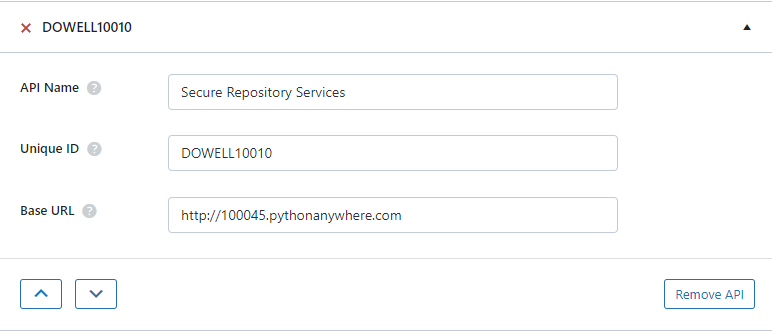
Set up the API name, unique ID and the base url(below). It’s a prerequisite to have WP-GET API plugin installed in your wordpress website
1. Repository Clone
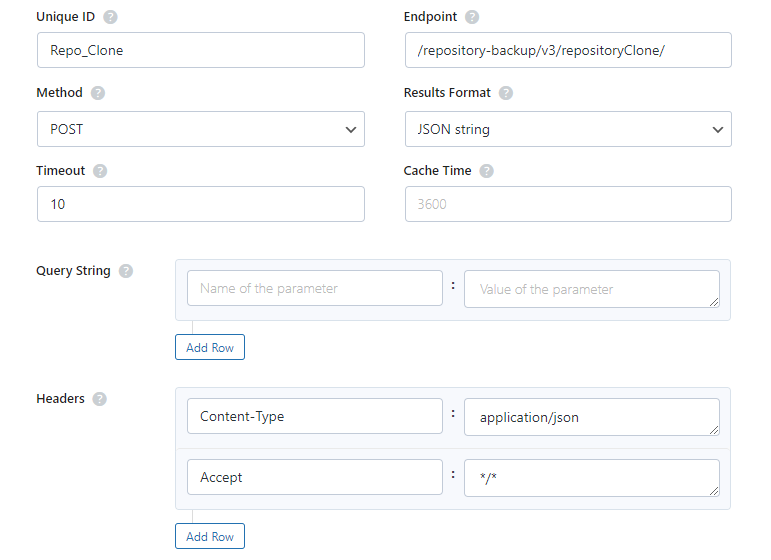
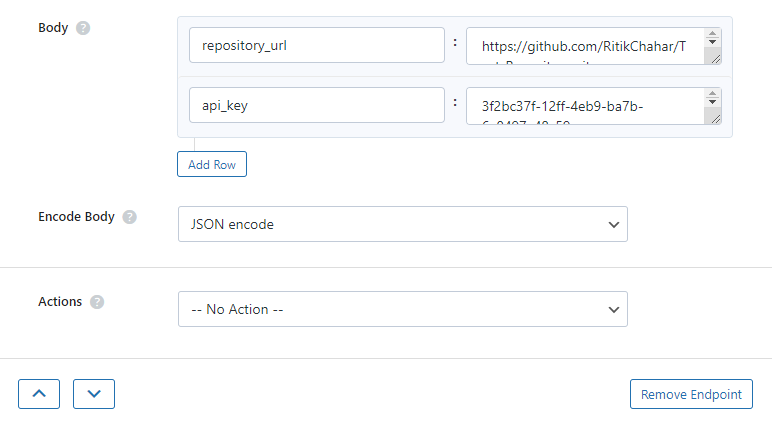
Step 1: Establish the API endpoint with the inclusion of the API key, and configure the request body to contain the required POST fields.
Step 3: Test the endpoint to obtain a jQuery response from the API. Ensure that the API is functioning correctly by sending a test request and examining the response.

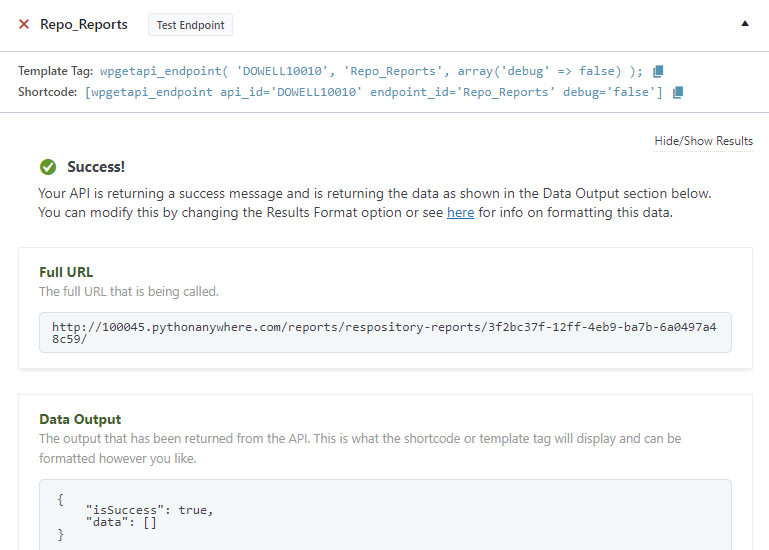
2. Repository Reports
Step 1: Establish the API endpoint with the inclusion of the API key, and configure the request body to contain the required POST fields.
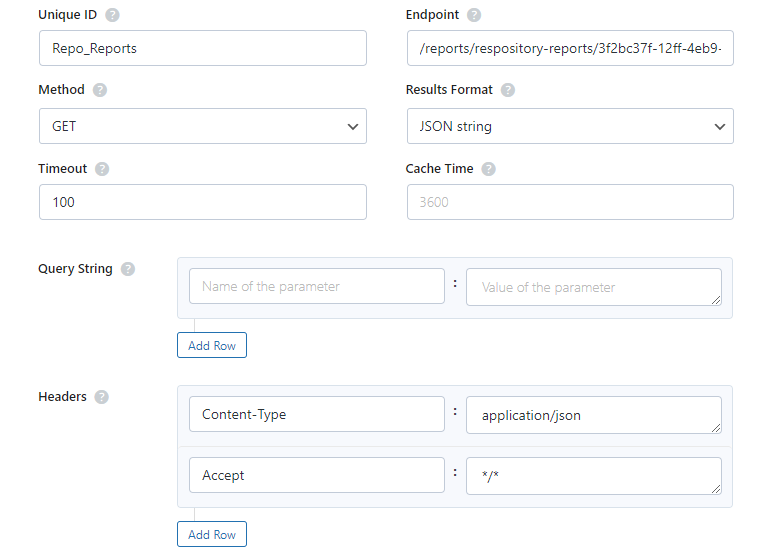
Step 3: Test the endpoint to obtain a jQuery response from the API. Ensure that the API is functioning correctly by sending a test request and examining the response.
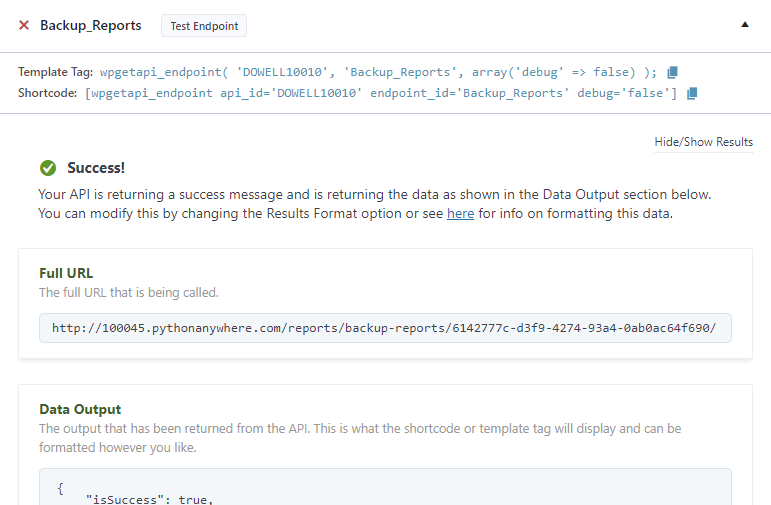
3. Backup Reports
Step 1: Establish the API endpoint with the inclusion of the API key, and configure the request body to contain the required POST fields.
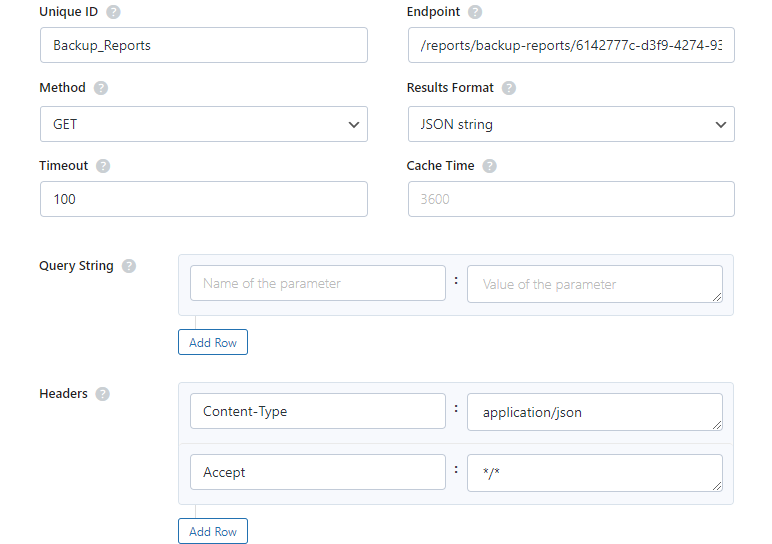
Step 3: Test the endpoint to obtain a jQuery response from the API. Ensure that the API is functioning correctly by sending a test request and examining the response.

D’Well Research validates and explores each stage of open innovation using user experience research from the field to support user-centered product design of medium and large companies globally.
DOWELL WEBSITES
QUICK LINKS
Our Visitors
 Views Today :
  Views Last 30 days : 263
 Views This Year : 985
 Total views : 3909